Abstract:
The intended audience of this article includes beginners, designers, developers, testers, business analysts, project managers who have the desire to learn Blockchain. How D-Apps integrated with Blockchain Ethereum network? How to write, compile, migrate and test smart contracts over Blockchain Ethereum network? How to install the Ethereum test platform? How to sort out all dependencies and browser extensions to see a running D-App on your local system and talking to Blockchain Ethereum network? I will be sharing an example decentralized application during the course of this article.
Introduction:
Before getting into details of how all pieces and components in Blockchain based decentralized application works, It is first important to understand what these components are and why these are required to develop D-Apps with Blockchain. Blockchain is popularly known in developing projects related to Cryptocurrency such as Bit-coins, Ethers, PotCoin, LiteCoin, DigitalNote etc. however, it is also a key technology in developing D-Apps for various verticals like Gaming, Banking, Healthcare, Real estate, Ride Sharing, Legal, Politics, Education and of course many more, what it is all set to disrupt.
What is Blockchain:
As its name suggests, Blockchain is a chain of Blocks. A Block is nothing but a set of transactional data, which is secured in a cryptographic manner using Hash-key 256. These Blocks keep on adding on one’s own machine with every single transaction processed on Blockchain network. This data can be accessed by a particular user using an account in the form of a private key associated with their wallet. Though, the data is publically available to all the users over the Blockchain network. But, how these Blocks sits upon one’s machine, I would explain in this article later, in a combined paragraph with other components as part of Blockchain architecture.
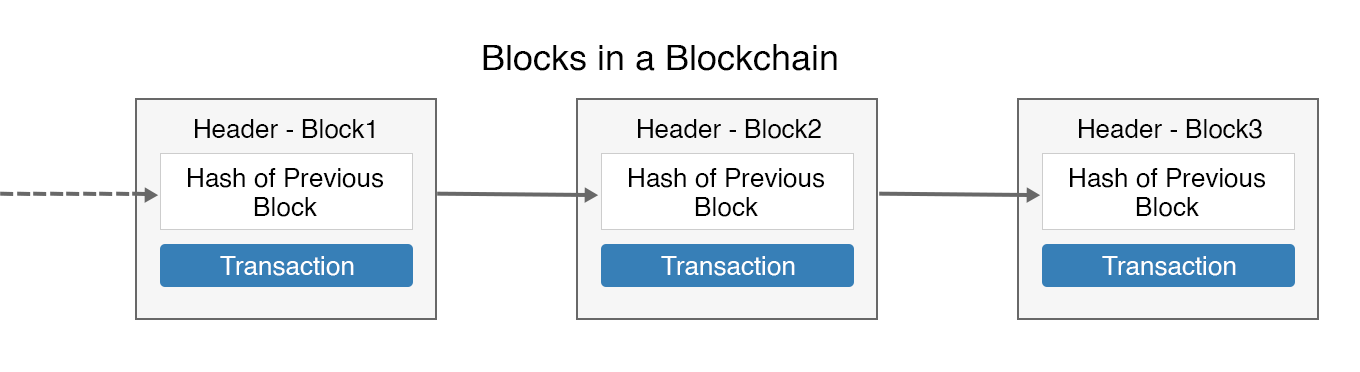
What is Blockchain Ethereum:
Blockchain Ethereum is a network, which supposes to be installed on the user’s machine to make sure that Blockchain is running on that particular machine. If Blockchain is not running on a machine then it is impossible to migrate (or say deploy in other terms) smart contacts over Blockchain. This means that you can neither read nor write to a Blockchain, what a smart contract suppose to do with running Blockchain network. I would be explaining it further in this article, at a later stage.
What is a Smart Contract:
A smart contract is the piece of code, which ensures to read or write data to Blocks on a Blockchain network. The Smart Contracts also consist of business rules, which ensures and validates users transactions over a Blockchain. How to write smart contracts and why it is extremely important to write defect-free smart contracts, I would be addressing in a special paragraph of “Essentials To Know“, in this article.
What is gas:
In Blockchain terminology, gas is fee/money what you need to migrate a smart contract over Blockchain network. It is usually pointed towards cryptocurrency like Ethers, which is required when your smart contract supposes to write data on Blockchain. This could be referred to as Ethers or Bitcoins. Before every smart contract to migrate, your wallet has been checked for an adequate amount of gas (Ethers), what you possess at the time of migration. If it is lesser than the desired amount for a smart contract to be migrated, then in that case, the smart contract will not deploy over running Blockchain.
Now, let’s be through with some more services associated with Blockchain, which is good to know. Though, I have not included any of these additional services in my example code.
What is Escrow Account:
An escrow account holds by an escrow agent, which sits in between buyer and seller during cryptocurrency transactions, to make sure that transaction is secure, authenticated and fair. There are some platforms provide escrow services, one of them is Feelium. The buyer purchases tokens from the escrow service platform against Fiat currency and deposits the same into an escrow account with his wallet private key. As soon as, a smart contract between buyer and seller signed, the seller submits proof of delivery of cryptocurrency to escrow service. The escrow service, in turn, prompts a notification to the buyer to release funds in form tokens, what has been purchased against fiat money by the buyer and deposited in his wallet account. In case of default from the buyer, the escrow service makes sure to pay the fiat money to the seller against the transfer of cryptocurrency made by the seller.
What is KYC in cryptocurrency transactions:
KYC is known as know your customer. There are some platforms like Civic, which provides these services to ensure that both buyer and seller are authenticated. Buyer and seller can upload their documents, biometrics etc to escrow agent using this service.
What is Fiat currency:
Fiat currency is a legal tender and backed by the central government of a country, regulated by a central authority like a central bank. For example Dollars. This can be traded physically as a paper printed currency or electronically traded like a bank credit/transfer etc.
What is Crypto Mining:
Crypto mining or cryptocurrency mining is a term associated with miners (hardcore Blockchain developers), who are connected to Blockchain and authenticate that a recent transaction has been processed securely and safely. In cryptocurrency trading, every single transaction with every single ownership of cryptocurrency gets recorded to Blockchain digital ledger. This updated ledger is available publically to all the nodes (a machine) connected in a Blockchain network. The cryptocurrency transactions are highly secure with a cryptographic mechanism. A miner competes with other miners to crack the code by solving complicated mathematical problems using cryptographic hash functions. The miner who first announces the authenticity of a cryptocurrency transaction is awarded a fee in the form of some cryptocurrency.
The versatility of Blockchain by offering solutions to almost every vertical, prompted blockchain development companies to be part of this latest technology trend.
How Blockchain works – The architecture and its components:
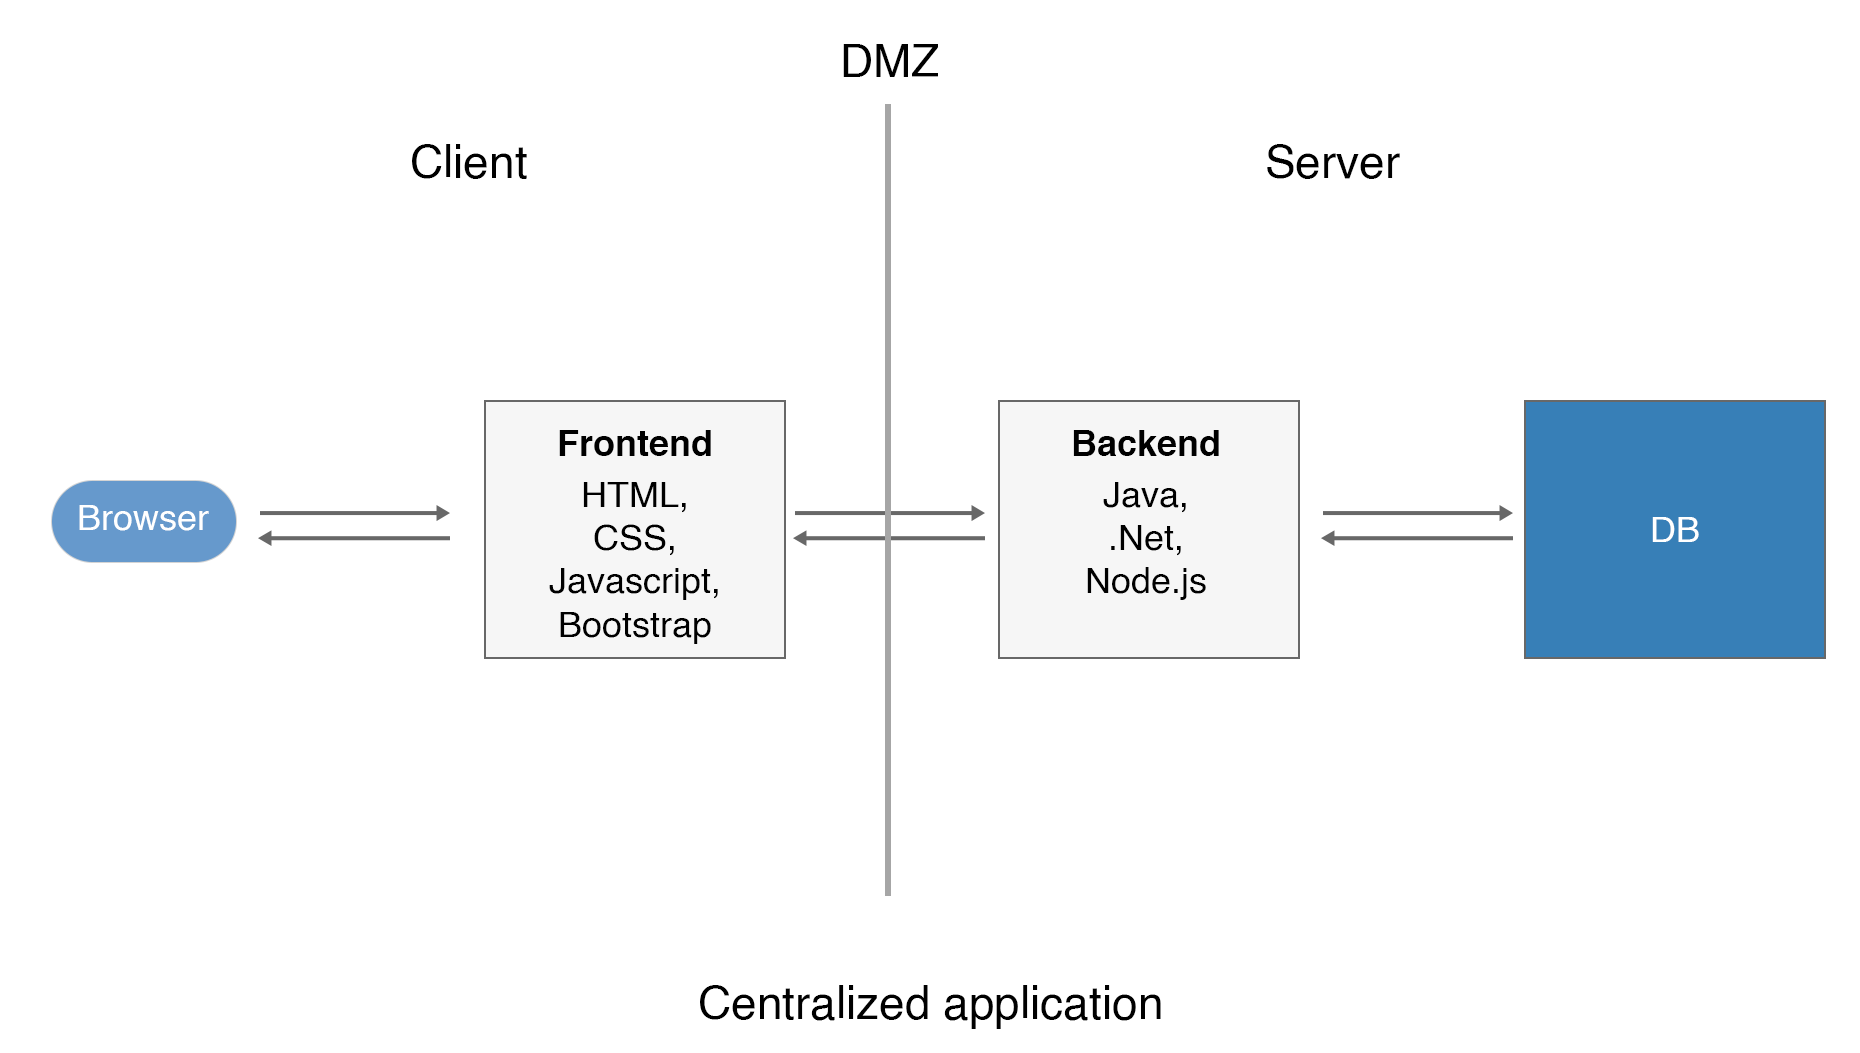
To understand it, just think of a centralized application, where you have deployed your application over a centralized web server/container with one common database. Then, you provide users with a frontend UI, using which users perform the action on UI. These actions first call the APIs integrated with UI components, which in turn, access some business delegates (business logic classes) or DB directly or having some ORM (Object Relational Mapping) layer in between before accessing DB. This way, user view, write, update and delete data in a centralized database.
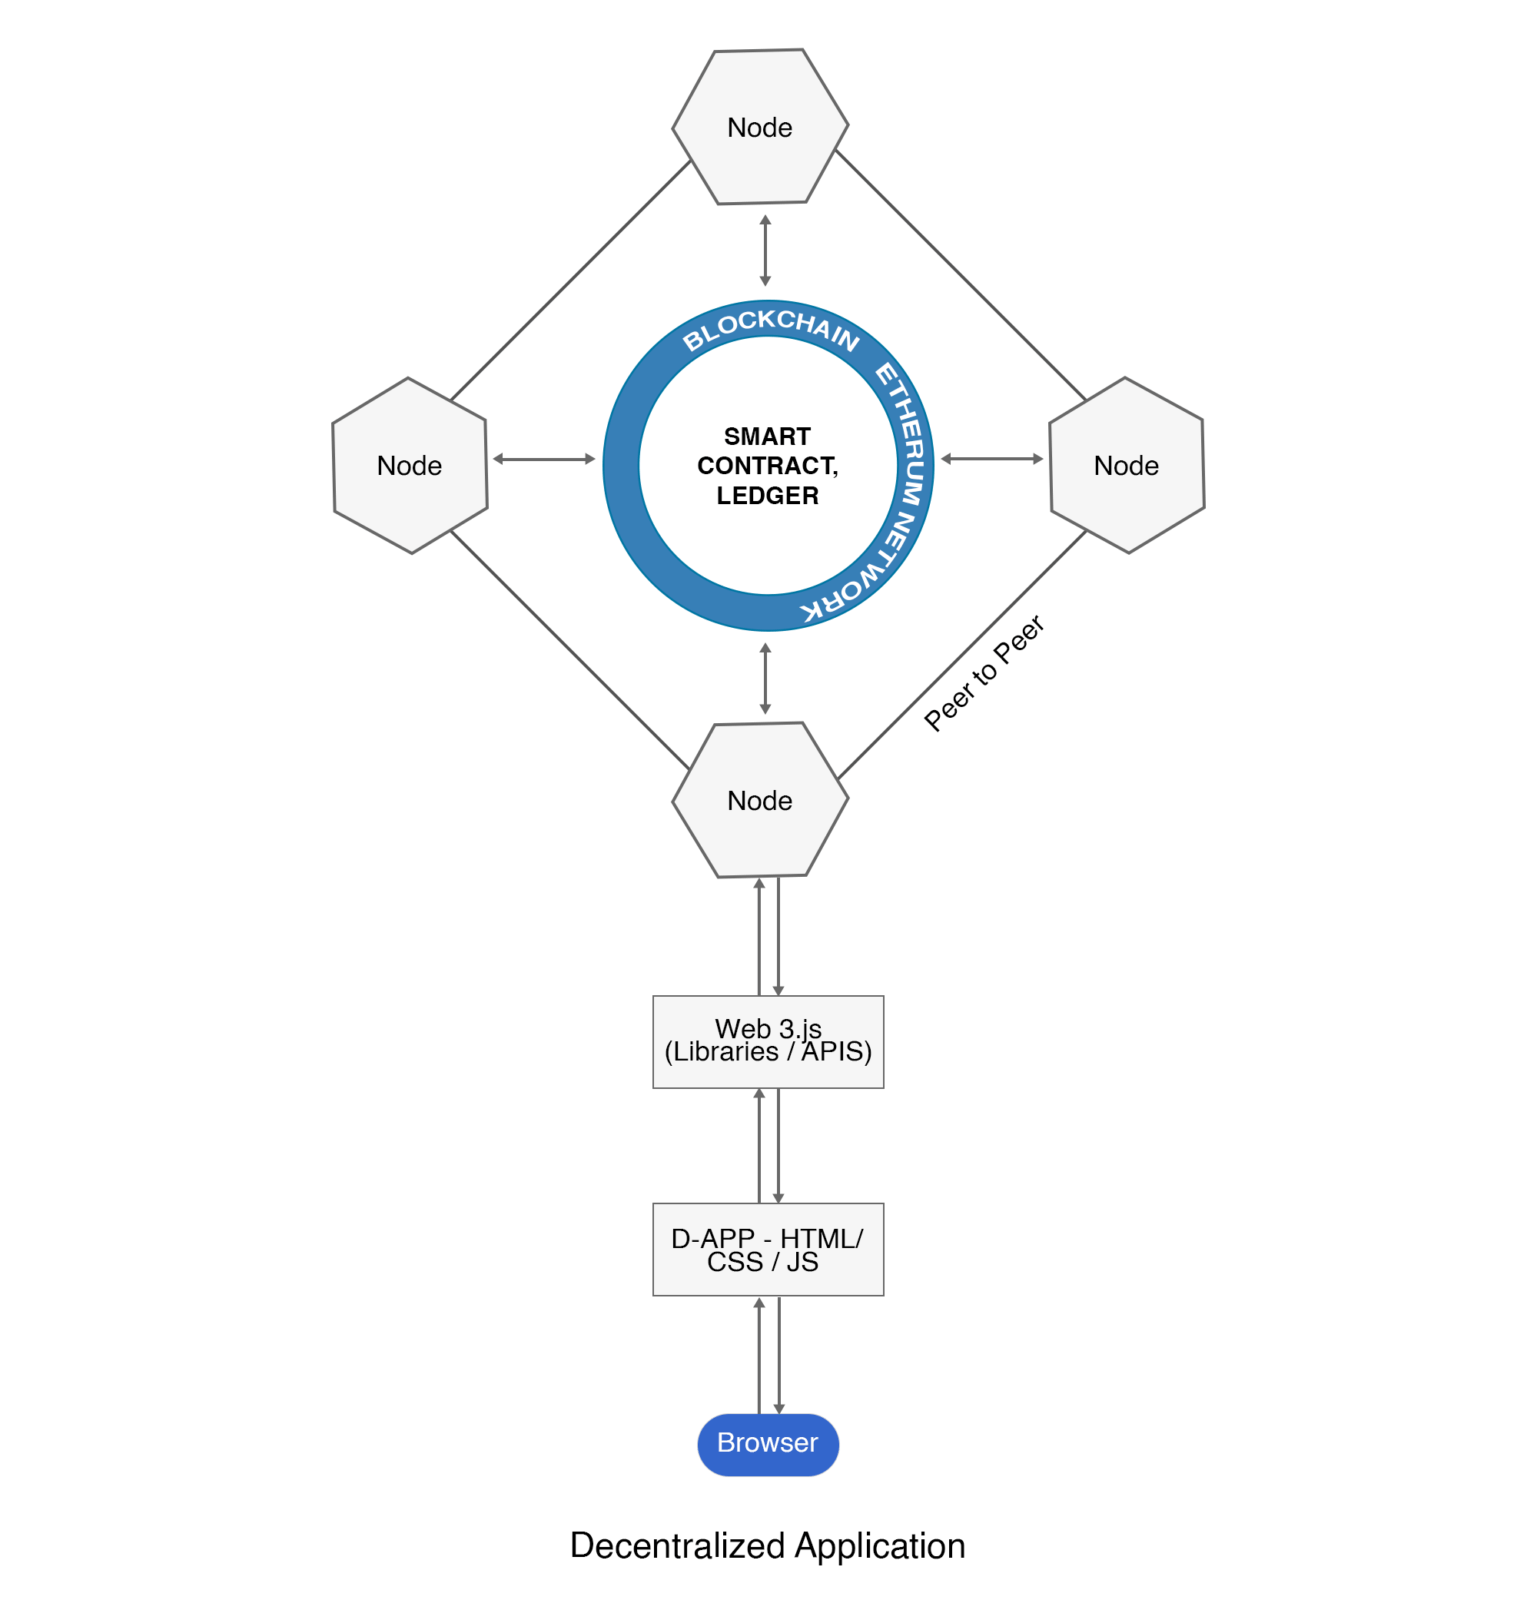
Now, you need to replace above-mentioned components in various tiers with Blockchain components. Please follow bullets below…
1. Blocks of data, in a Blockchain are nothing but your Database but this is decentralized. Why this is decentralized because it stays on your own machine, once you install a Blockchain network like Ethereum to ensure Blockchain is running on your machine. Your machine merely becomes a Node on the Blockchain network and connected with other Nodes (other machines on Blockchain network) in a peer to peer fashion.
For your understanding, in peer to peer network, a machine talks with another machine without having need of centralized server in between. For example, hopefully, you must be aware of Whats App, a very popular chat and audio/video calling application, which also use the strength of peer to peer network but that doesn’t use Blockchain and use XMPP servers. I, only, quoted Whats App for the sake of giving an example of a peer to peer network as for now it has nothing to with Blockchain.
2. Next, replace business delegates/business logic in above-centralized architecture with Smart Contracts, which would be performing read/write operation on data in blocks. You need to make sure that your smart contracts are well deployed over a running Blockchain.
3. The next thing in line is UI. The user interface (client-side application), what you are providing users as D-Apps (Decentralized Applications). Now, you must be wondering that how D-Apps would connect to smart contracts over a Blockchain? Here comes the answer, in the Blockchain scheme of things, there are some open source libraries available, which are nothing but a form of APIs. One such library is web3.js. These libraries connect frontend of a D-App with smart contracts. As explained above, a smart contract is a component to read/write over a Blockchain. Hence, your client-side D-App, is now connected end to end with a running Blockchain network on your machine.
I believe, you have got some understanding of Blockchain architecture, till this point. But to achieve a running Blockchain and integrating your D-App with Blockchain, you will need to install a number of dependencies and browser extension to make it work.
List of Dependencies:
Before jumping into code snippets in this article, let’s discuss some of the dependencies what and why you just need to integrate a D-App with Blockchain network.
A. Node Package Manager:
In order to run D-App, this is required to be installed.
To check, if it is already installed on your system then run following command
Linux (Ubuntu):
$ node -v
If require to install, run command, as given below
$ sudo apt-get install nodejs
On a windows machine, you can download windows installer for the same.
B. Truffle Framework:
This framework is key. This will provide us the capability to compile and migrate/deploy smart contracts over running Blockchain Ethereum network on your machine, which is written using programming language Solidity. Following is the command to install it.
Linux:
$ npm install -g truffle
Windows:
npm install -g truffle
C. Ganache:
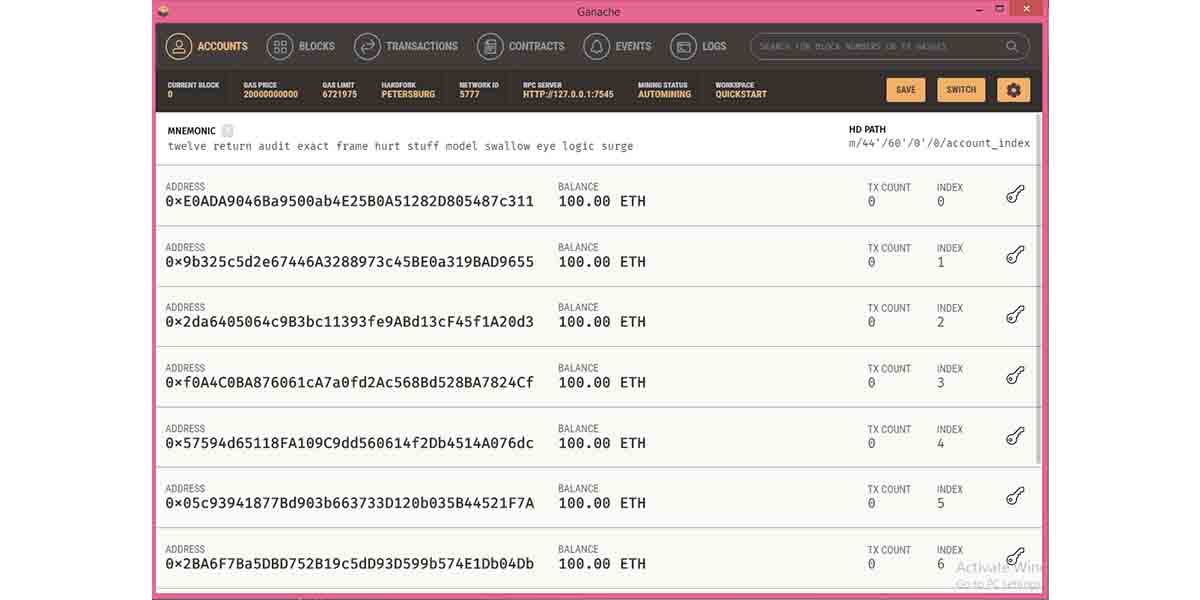
This is locally available in memory Blockchain Ethereum network on your development machine, which provide 10 external accounts with addresses. Every account has been provided with 100 test Ethers. You can install it from Truffle framework website both for Windows and Linux systems. This installation will provide you test Blockchain Ethereum network/platform running on your local machine.
Just for sharing, you can also install geth for your system to see a real running Blockchain Ethereum and can create your wallet account. But, we are not using it in our examples so you can avoid it for now. To see geth is running, if installed, you can use following command
geth –rpc
D. Metamask:
This is required in order to connect to a running Blockchain Ethereum network from the Chrome browser and it’s an extension to be added to Chrome. As Blockchain is a network. This will enable the browser to connect to local Blockchain Ethereum network and allow D-Apps to interact with smart contracts using your personal account. How to configure it, I will explain it later in this article.
E. Install web3.js
This is the APIs library, which sits between your client-side D-APP and smart contract. Please use the following command to install “web3.js”. This will get install under “node_modules” directory.
npm install web3
F. Solidity and Sublime Text:
Solidity is the programming language what we would be used to implement smart contracts. Sublime is the IDE. Install it as per your OS requirements.
Now, let’s move to example code snippets for a small test decentralized application with following steps.
Step 1:
Create a project directory and set this directory as the current directory.
Linux:
$ mkdir survey
$ cd survey
Windows:
md survey
cd survey
Step 2:
As, we are within the project, now it’s time to install a Truffle Box inside this project directory. We will install and go for Pet Shop Box, provided by Truffle. Please use the command below.
Linux:
$ truffle unbox pet-shop
Windows:
truffle unbox pet-shop
Following is the image of what all pet shop box has installed in the project directory.
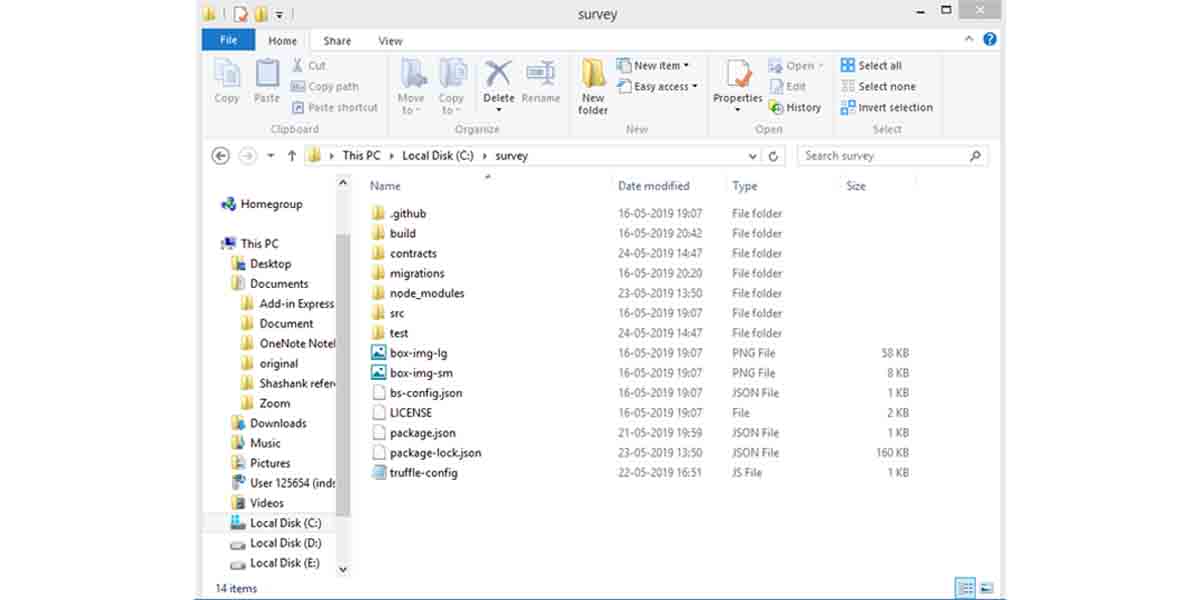
Let’s go through some directories and files of importance to know, what all they meant for.
contracts:
This is the directory where we are going to save all of the smart contracts, what we are creating. By default, there is a smart contract migration.sol, which empowers migration or deployment of smart contacts, implemented by us, to Blockchain network.
migrations:
To have a smart contract deployed over Blockchain, we need to migrate that smart contract. Hence, the migration file for a corresponding smart contract placed here. These files are javascript files. As soon as, a smart contract migrate over Blockchain, it changes the state of Blockchain. The most important point to note here, while implementing a migration file, is to start that file with a number. By default, “1_initial_migration.js” is the first migration file, which initiates the migration process of smart contracts. It’s naming convention starts with the numeric number “1”. This means, the next smart contract what you want to migrate next, will have corresponding migration file starting with the numeric number “2”. Hence, the sequence goes like 3, 4, 5 etc. as per your requirement that sets migrations process to be executed in a sequenced manner starting with the numeric number “1”.
node_modules:
All node related dependencies stay here.
src:
In this directory, we keep the code of our client-side application., which includes HTML, CSS, JS etc. files.
test:
In this directory, we keep files what we coded to write automated unit tests to test smart contracts.
truffle-config.js
This is Truffle project configuration file. Though, you can add a number of defined configurations here but for this article, we just need to check network settings related parameters.
All set, now start with implementing our first smart contract. We are doing an example survey between Metro Rail and Rapid Rail as a mode of public transport to poll that which system is most preferred by the public. We will start adding Metro Rail first in the smart contract and then add Rapid Rail to further update this smart contract.
Step 3:
Create a file with file name “Survey.sol” and save it in contracts directory. This file is being coded using Solidity. Please have following lines of code inside this file.
// I am using solidity version as 0.x.0 in this example to avoid compilation error, as, if I am // using a version here which is lower than Truffle compiler version then it will give a
// compilation error.
pragma solidity 0.x.0;
contract Survey {
string public metro;
// Constructor – starting solidity version 0.4.2, you need to define constructor as given
// below, while earlier you can define constructor as same name of the smart contract,
// what you define above. But, this is deprecated now.
constructor () public {
metro = “Metro Rail”;
}
}
Step 4:
Now, we will implement a javascript migration file for this smart contract to migrate it to Blockchain.
Create a new file with the name “2_deploy_smartcontract.js” and save it in migrations directory. Please enter following lines of code in this file.
var Survey = artifacts.require(“./Survey.sol”);
module.exports = function(deployer) {
deployer.deploy(Survey);
};
Step 5:
Before running migration command, you must need to ensure following.
• Please make sure that local Blockchain Ethereum network is running on your machine. Remember, we have installed Ganache to install and run a Blockchain network locally on our system. Make sure, Ganache set up is running, if not yet, then start it. If Blockchain is not running then you won’t be able to migrate your smart contract.
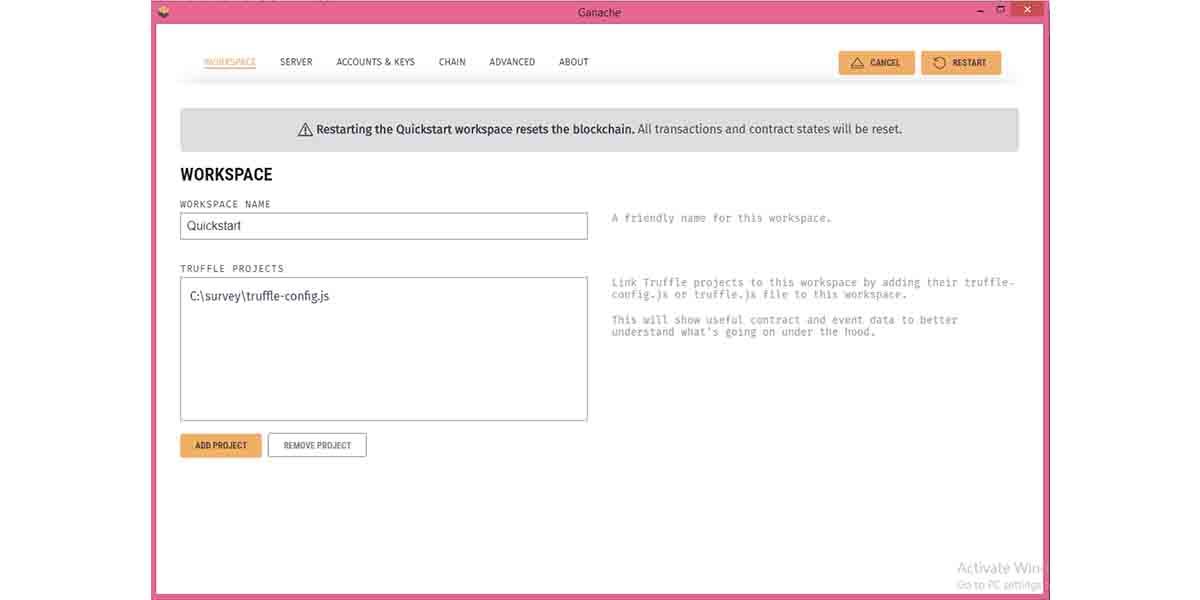
• Please check for host, port and network_id parameters in truffle-config.js file. These parameters match as per your local machine network settings or not. The network_id would be “*” by default, meaning any network, but you should reset it to Ganache Network id, which is “5777”.
• Please make sure to add your project in Ganache by adding truffle-config.js file in Ganache “settings”.
Step 6:
Run the following command to migrate smart contract, what you have just created.
$ truffle migrate (Linux)
or truffle migrate (Windows)
This command will first compile your smart contract file and then deploy the same to Blockchain Ethereum, which you ensure is running on your local machine.
Step 7:
To test the migration has been done successfully over a console in command prompt or bash, please run following commands in a given order and you will see the output as “Metro Rail”.
Linux:
$ truffle console
Survey.deployed().then(function(instance) { app = instance })
app.survey()
Windows:
truffle console
Survey.deployed().then(function(instance) { app = instance })
app.survey()
Fantastic, now, not only your first smart contract is implemented and deployed over Blockchain by you but also you have retrieved data of it.
Step 8:
Let’s enlarge our smart contract now by adding code for Rapid Rail system. Please update your Survey.sol file with newer code as given below.
pragma solidity 0.x.0;
contract Survey {
struct Transport {
uint uid;
string sname;
uint pollCount;
}
mapping(uint => Transport) public transports;
uint public transportsCount;
constructor () public {
addTransport(“Metro Rail”);
addTransport(“Rapid Rail”);
}
function addTransport (string memory _name) private {
transportsCount ++;
transports[transportsCount] = Transport(transportsCount, _name, 0);
}
}
Step 9:
Rest everything remains the same, but you have to re-migrate your smart contract over Blockchain with following command to see it working.
$ truffle migrate –reset (Linux)
truffle migrate –reset (Windows)
Step 10:
Excellent, but would you like to write unit tests for your smart contract to see your tests pass or fail as output over command prompt. We will write a very simple test for it. Why writing unit tests for smart contracts is important, you can find in paragraph “Essential To Know” at the last.
We will write a unit test to check the following.
1. To check that the contract has been initialized with the correct number of transport systems for this survey and the number of transport medium has been counted as 2 in this survey.
2. That each transport medium has a correct id, poll count and name.
For this purpose, create a file with filename “survey.js” and save it under “test” directory. Please enter following lines of code in this file.
var Survey = artifacts.require(“./Survey.sol”);
contract(“Survey”, function(accounts) {
var surveyExample;
it(“two transports has been initialized”, function() {
return Survey.deployed().then(function(instance) {
return instance.transportsCount();
}).then(function(count) {
assert.equal(count, 2);
});
});
it(“transport medium has been initialized with correct values”, function() {
return Survey.deployed().then(function(instance) {
surveyExample = instance;
return surveyExample.transports(1);
}).then(function(transport) {
assert.equal(transport [0], 1, “It’s a correct id”);
assert.equal(transport [1], “Metro Rail”, “It’s a correct name”);
assert.equal(transport [2], 0, “It’s the correct polls count”);
return surveyExample.transports(2);
}).then(function(transport) {
assert.equal(transport [0], 2, “It’s a correct id”);
assert.equal(transport [1], “Rapid Rail”, “It’s a correct name”);
assert.equal(transport [2], 0, “It’s the correct polls count”);
});
});
});
Let’s run this command now.
$ truffle test (Linux)
truffle test (Windows)
Here, we are done with unit tests for smart contact implemented. Well, now it’s the time to move to client side UI application part to integrate D-App UI with Blockchain via web3.js library and smart contracts.
Step 11:
Go ahead and replace the code of “index.html” file in “src” directory with the one given below.
<!DOCTYPE html>
<html lang=”en”>
<head>
<meta charset=”utf-8″>
<meta http-equiv=”X-UA-Compatible” content=”IE=edge”>
<meta name=”viewport” content=”width=device-width, initial-scale=2″>
<title>Transport Survey Results</title>
<link href=”css/bootstrap.min.css” rel=”stylesheet”>
</head>
<body>
<div class=”container” style=”width: 650px;”>
<div class=”row”>
<div class=”col-lg-12″>
<h1 class=”text-center”>Transport Survey Results</h1>
<hr/>
<br/>
<div id=”loading”>
<p class=”text-center”>Loading your smart contract…</p>
</div>
<div id=”hideContent” style=”display: none;”>
<table class=”table”>
<thead>
<tr>
<th scope=”col”>Serial Number</th>
<th scope=”col”>Transport Medium</th>
<th scope=”col”>Polls</th>
</tr>
</thead>
<tbody id=”surveyResults”>
</tbody>
</table>
<hr/>
<p id=”myAddress” class=”text-center”></p>
</div>
</div>
</div>
</div>
<script src=”https://ajax.googleapis.com/ajax/libs/jquery/1.12.4/jquery.min.js”></script>
<script src=”js/bootstrap.min.js”></script>
<script src=”js/web3.min.js”></script>
<script src=”js/truffle-contract.js”></script>
<script src=”js/app.js”></script>
</body>
</html>
Step 12:
Go ahead and replace the code of “app.js” file in “src” directory with the one given below.
App = {
web3Provider: null,
contracts: {},
myAccount: ‘0x0’,
init: function() {
return App.initWeb3();
},
initWeb3: function() {
if (typeof web3 !== ‘undefined’) {
App.web3Provider = web3.currentProvider;
web3 = new Web3(web3.currentProvider);
} else {
App.web3Provider = new Web3.providers.HttpProvider(‘http://localhost:7545’);
web3 = new Web3(App.web3Provider);
}
return App.initContract();
},
initContract: function() {
$.getJSON(“Survey.json”, function(survey) {
App.contracts.Survey = TruffleContract(survey);
App.contracts.Survey.setProvider(App.web3Provider);
return App.render();
});
},
render: function() {
var surveyExample;
var load = $(“#loading”);
var cont = $(“#hideContent”);
load.show();
cont.hide();
web3.eth.getAccounts(function(err, account) {
if (err === null) {
App.myAccount = account;
$(“#myAddress”).html(“My Account Number: ” + account);
}
});
App.contracts.Survey.deployed().then(function(instance) {
surveyExample = instance;
return surveyExample.transportsCount();
}).then(function(transportsCount) {
var surveyResults = $(“#surveyResults”);
surveyResults.empty();
for (var i = 1; i <= transportsCount; i++) {
surveyExample.transports(i).then(function(transport) {
var id = transport[0];
var name = transport[1];
var pollCount = transport[2];
var transportTemplate = “<tr><th>” + id + “</th><td>” + name + “</td><td>” + pollCount + “</td></tr>”
surveyResults.append(transportTemplate);
});
}
load.hide();
cont.show();
}).catch(function(error) {
console.warn(error);
});
}
};
$(function() {
$(window).load(function() {
App.init();
});
});
Here, it is important to note in “app.js”, that web3.js which is a javascript library is acting API to talk to Blockchain via smart contract. It has been invoked inside the initWeb3 function.
At this point, your D-App is ready and waiting to get connected to Blockchain Ethereum network running on your local machine. Hence, run following commands on your respective OS to get it working…
- Your smart contract should well migrate to running Blockchain.
truffle migrate –reset
- Start local development server
npm run dev
All set and you can see your browser (default Chrome, as we have Metamask extension installed for it) or start your Chrome browser and type “localhost:3000” in the URL bar. But, the browser keeps displaying “Loading your smart contract…” and contract data will not render. You will also observe a different account address which is not listed in your 10 free accounts addresses provided by Ganache. Here comes the last step of configuring Metamask to make it work.
Step 13:
Go to the right top of your Chrome browser and you will see a fox icon, which is nothing but your Metamask extension. Click on it. It will ask you to accept policies. Then, you need to create a new account, if you do not have an existing account. During account creation, it will share a 12 words secret key with you what you need safely maintain, along with username and password. Once, you are logged in to Metamask, you need to do followings…
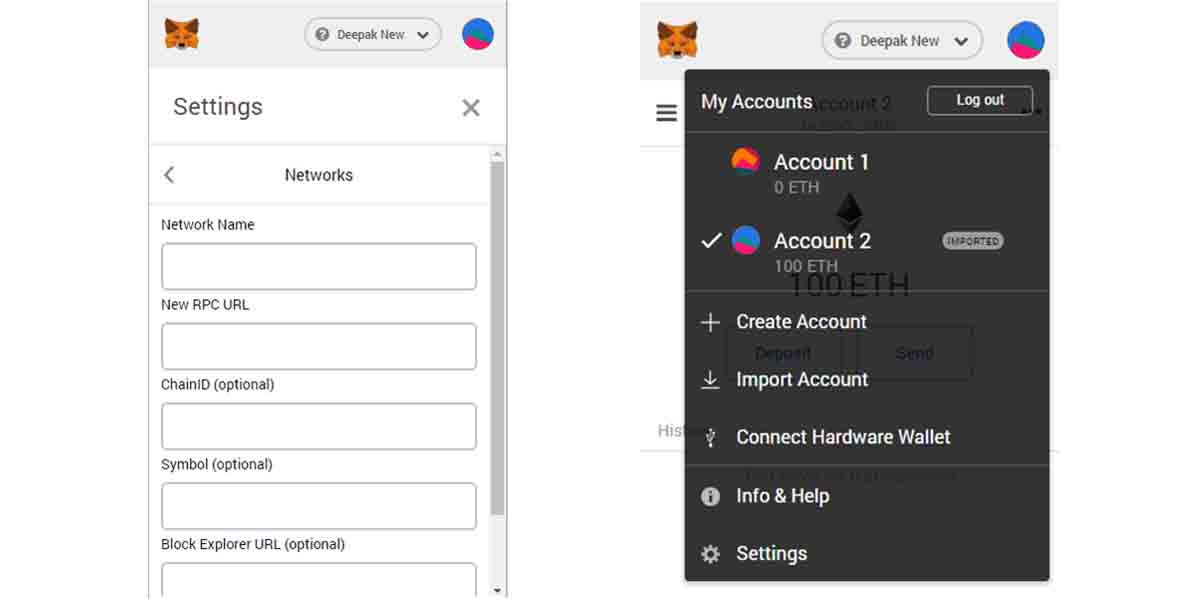
1. You will see network dropdown at the top with the default selection of “Main Network”, which is required if you are accessing a real-time or live Blockchain Ethereum network. But, we are supposed to access local Blockchain Ethereum network set up by Ganache for us. Hence, select “Custom RPC” from this list to configure your own network.
2. This will open a settings screen. Enter “Network Name” of your choice. Then, to enter the RPC URL, what you need to match and copy the URL and port number Ganache is showing. Enter “localhost:port-number” in this field. Rest, all fields are optional in this setting, leave them and press “Save”.
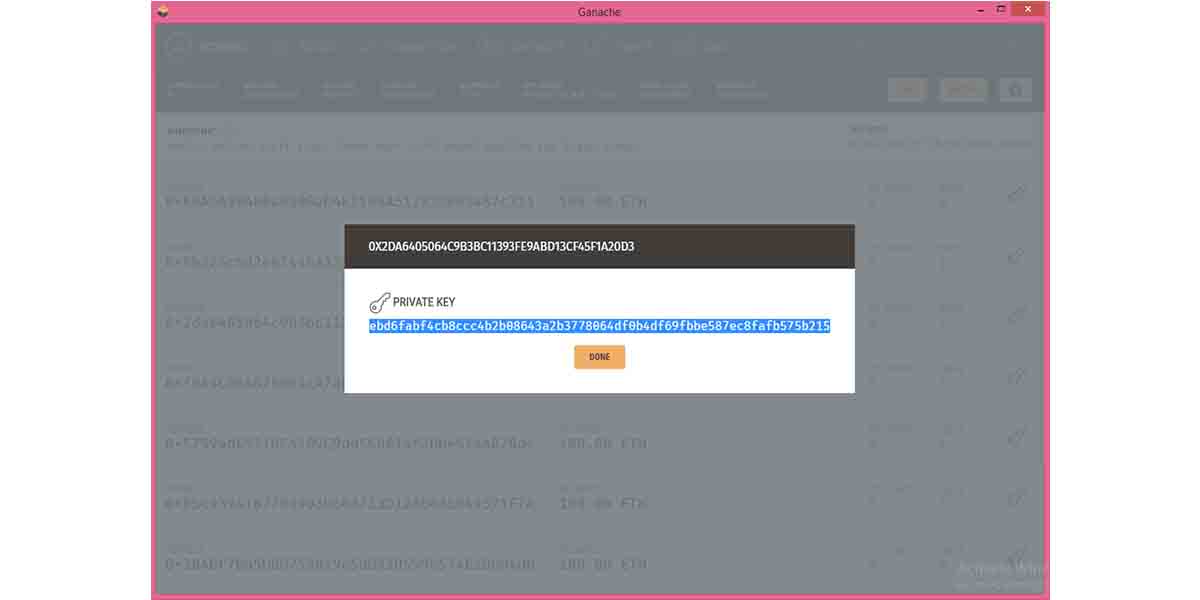
3. Click at right Top Menu, in Metamask and select import account. This will open a field with the name “private key”. Go to Ganache, main page, you will see 10 free account addresses for you. In right most against every address, you will see a key icon. Click on this key icon, and it will open up a dialogue showing the private key for that account address. Copy it and paste it as a value in Metamask private key under “import account”. Add it and you are done.
4. Last but not the least, go to “settings” in Metamask from the top right menu, open “security and privacy” and then switch OFF the toggle for “privacy mode”. Otherwise, you won’t be to see account address on browser for which you have imported the private key from Ganache. By default, this setting is ON.
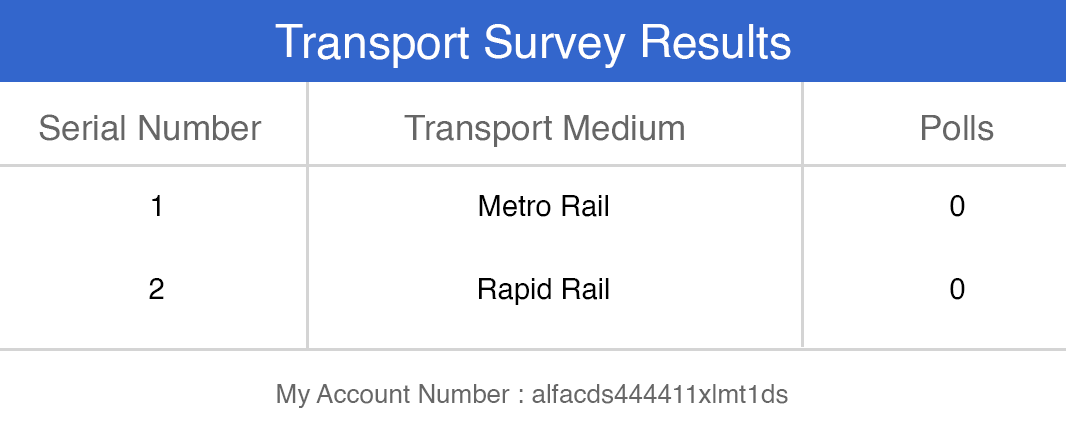
Images for reference:
Instantly, you will view the browser showing your account address as well as your smart contract data with id, name, and count in a table. The names of transports, which are supposed to contest for the poll, will display as Metro rail and Rapid Rail.
The probable output of example code, shared in this article:
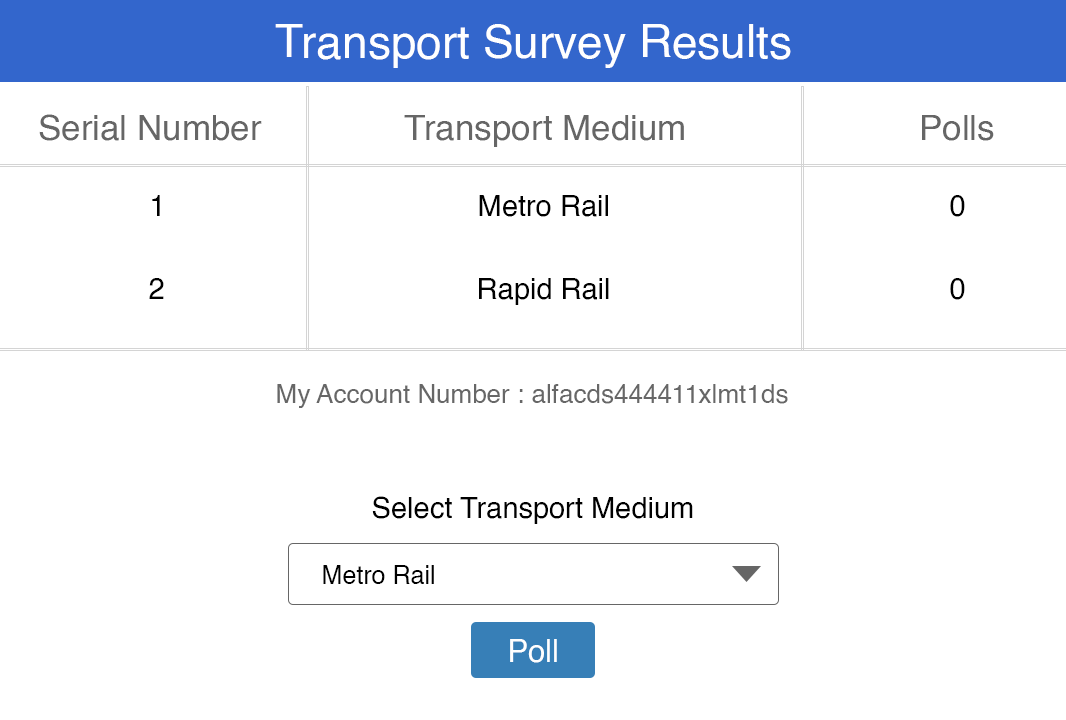
Now, to start polling for the same ensuring no node can vote more than once, you need to further update both smart contract and client-side application. Then, you need to reset migration, restarting Ganache and restart your local development server. None else is required.
Interesting!! I am leaving here as an exercise for you to enjoy integrating your extended D-App integration with Blockchain Ethereum network. Please find below the expected output of your exercise. All the best…
The feasible output of the exercise, what you suppose to complete:
Essentials To Know:
• Make sure all the dependencies and extension are installed well, when you are developing, migrating and testing smart contracts over Blockchain network. In this article, we are using Blockchain Ethereum.
• Make sure Blockchain is running on your system otherwise smart contracts will not get migrated.
• On Blockchain, it is free to read that means you can view data without spending gas (ethers) when smart contracts fetch data for you from Blocks.
• On Blockchain, when smart contract writes data, there is a cost associated with it, which depends upon the size and number of smart contracts involved in doing so.
• In addition to the above bullet, developers have to make sure that they are writing defects free smart contracts, which are very well tested by unit tests covering all corner cases. In case, developer migrates a smart contract having defects, then this will result in two issues. One, the smart contracts require to migrate/deploy again resulting in paying gas again, which will add to cost. Secondly, any time developer migrates/deploy a smart contract, it will be given a new address.
• Once you write the data to a Blockchain, it can’t be reversed as contracts written over Blockchain network is immutable.
• As a user in real time cryptocurrency transactions, it is remarkably important to save and maintain private key associated with your wallet account. If you have cryptocurrency reserves but lost your private key this means in other terms that, you have lost your fiat money completely and it can never be recovered from Blockchain network now.
The blockchain app development is not just confined Ethereum for decentralized app development and there other contenders in this field like Cosmos, Cardano, EOS, Hyperledger etc.
About Author:
Deepak Chhabra is working as VP - Product Engineering in QSS Technosoft Pvt. Ltd.
About QSS:
QSS Technosoft has a proven track in Blockchain App Development for its esteemed customers. So you can be sure that your journey into the exciting new world of blockchain technologies will not be alone.