Abstract:
This article demonstrate each and every steps required for adding font style in your app. Xamarin already contains some popular font styles but if you want to add a new font style then this article completely belongs to you. This article will help you in applying font style in some specific controls or overall app.
Introduction:
Adding a font Style in your app requires the font file. We need to add the file of that particular font style. If you don’t have the file, you can easily download it from Google. I have mentioned below some file extensions which are supported by Xamarin.
- 1) TTF (TrueType Fonts)
- 2) OTF (OpenType Fonts)
- 3) WOFF (Web Open Font Format)
You can use font file with any of these extension. Same font file work for Android and iOS. We just need to include the file in the project. Now Let’s start with a sample app
Steps required for creating sample app:
- 1) Create a new Xamarin app (Shared or PCL)
- 2) Add Font file in your project ,I am using “GreatVibes-Regular.otf” file for example.
- Add File in Android:
Firstly you need to add the font file in .droid project. I am adding the file in Assets. You need to right click on the Assets folder and then add file.
Add File in iOS:
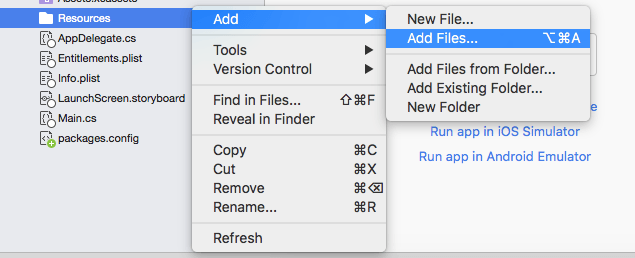
Also add the font file in .iOS project. You have to add the font file in Resources folder like shown in the image below:
One thing you need to check very carefully after adding the font file. Right click on the file and go to the Build Action and it should be Bundle Resource in iOS and Android Asset in Android.
Now we are ready to use that file.
- Add File in Android:
- 3) I am going to test my font style on a Label. So add a Content Page in shared code (or core) and write the mentioned code in xaml file:

- 3) I am going to test my font style on a Label. So add a Content Page in shared code (or core) and write the mentioned code in xaml file:
- 4) For showing the same font style allover in example app, we need to extend all the controls used in the app like Entry, Button, Editor etc. For extending any control, we have to write a renderer for it.
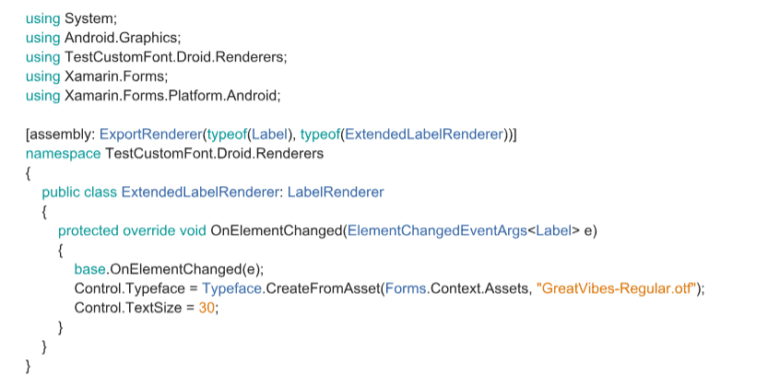
So I am starting with Android. In .droid project, create a folder with name Renderers and then add a class in it. I am creating a class with name ExtendedLabelRenderer.
Extending Label in Android:

Add this code in the class, which creates the renderer of the label control. In the first line above the namespace, we are giving the assembly information. This renderer is for Label so I have written Label. If you want to create the renderer for entry then the line should be like this:
[assembly: ExportRenderer(typeof(Entry), typeof(ExtendedEntryRenderer))]
In this case class name should be ExtendedEntryRenderer. After the assembly info, we were inheriting the class LabelRenderer but if the renderer is for Entry then you should inherit EntryRenderer.
Now, I have to add a override method OnElementChanged which takes one argument. If you are writing for a label then pass ((ElementChangedEventArgs<Label> e) but if you are creating renderer for entry then pass ((ElementChangedEventArgs<Entry> e)
Control.Typeface = Typeface.CreateFromAsset(Forms.Context.Assets, "GreatVibes-Regular.otf");
Add this line in OnElementChanged. Here, Forms.Context.Assets is the location where the file is placed and the second parameter is the file name.
Now run the project and you can see your font style in allover the app.
Extending Label in iOS:
Similar to Android, we have to extend the controls in iOS also. Now we are going to repeat the same steps in iOS. Create a folder with name Renderers in your .ios project and add a class file in it. I have mentioned the code for Extending the label below.
using System;
using TestCustomFont.iOS.Renderers;
using Xamarin.Forms;
using Xamarin.Forms.Platform.iOS;
[assembly: ExportRenderer(typeof(Label), typeof(ExtendedLabelRenderer))]
namespace TestCustomFont.iOS.Renderers
{
public class ExtendedLabelRenderer: LabelRenderer
{
protected override void OnElementChanged(ElementChangedEventArgs<Label> e)
{
base.OnElementChanged(e);
Control.Font = UIKit.UIFont.FromName("GreatVibes-Regular", (System.nfloat)e.NewElement.FontSize);
}
}
}
Just like Android you can modify this renderer for other controls. Now you can run the code and you will be successful in changing the font style. There is another situation that you need to apply a specific font style on some controls. In this case you need to create a extended control like:
[assembly: ExportRenderer(typeof(ExtendedLabel), typeof(ExtendedLabelRenderer))]
namespace TestCustomFont.iOS.Renderers
{
public class ExtendedLabelRenderer: LabelRenderer
{
protected override void OnElementChanged(ElementChangedEventArgs<Label> e)
{
base.OnElementChanged(e);
Control.Font = UIKit.UIFont.FromName("GreatVibes-Regular", (System.nfloat)e.NewElement.FontSize);
}
}
}
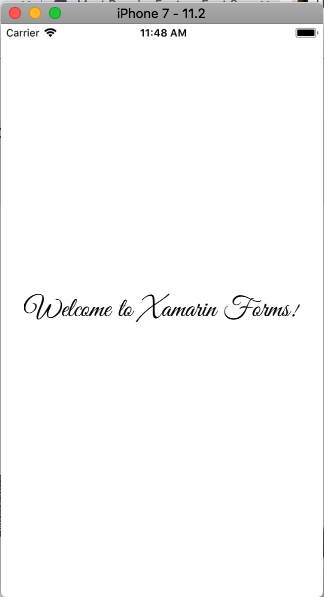
Final output on Android and iOS:

With the above blog, now you can easily insert custom fonts in xamarin.forms But, in case you encounter any challenge, feel free to contact our xamarin app development experts.
About Author:
Rashi saini is working in QSS Technosoft as a Xamarin Developer. She has a good experience in Xamarin.Forms(PCL and Shared both) and Xamarin native. She likes to be aware with new trends in technology.
About QSS:
QSS Technosoft is leading Xamarin App Development Company developing a cross-platform mobile applications for its esteemed customers. The company has a core competency in developing and delivering Enterprise level Xamarin applications both in Native and Hybrid platforms. The Xamarin competency has experienced and dedicated team of Xamarin developers.
How to add custom fonts in Xamarin.forms?