Creating a web application development- Abstract
This article provides you with a basic idea of creating a web application. It contains each and every step required for creating a web application development which provides the functionality for User Login, Registration, and CRUD Operations using code first approach.
Introduction to Code First Methodology
Code First is a procedure which encourages us to first create POCO classes and then create a database from these classes. It is useful when you don’t have database prepared and you need to begin working with the new crisp venture and need to make a database, and then keep updating the database legitimately from your code.
This article will assist you with understanding what the Code First methodology is and how we can accomplish it in ASP.NET Core MVC applications, utilizing Entity Framework Core movement. Movement dependably causes us to make, update and match up the database with your model classes. In this article, we will understand the EF Core migration step by step.
Software Requirements:
1. Visual Studio 2017 with .Net Core.
2. MS SQL Server Management Studio 2012 or Above.
1. Creating a new ASP.Net Core project
Follow the specified steps to create a new ASP.NET core project.
A. Open Visual Studio 2017.
B. Snap to File> New > Project from the Menu.
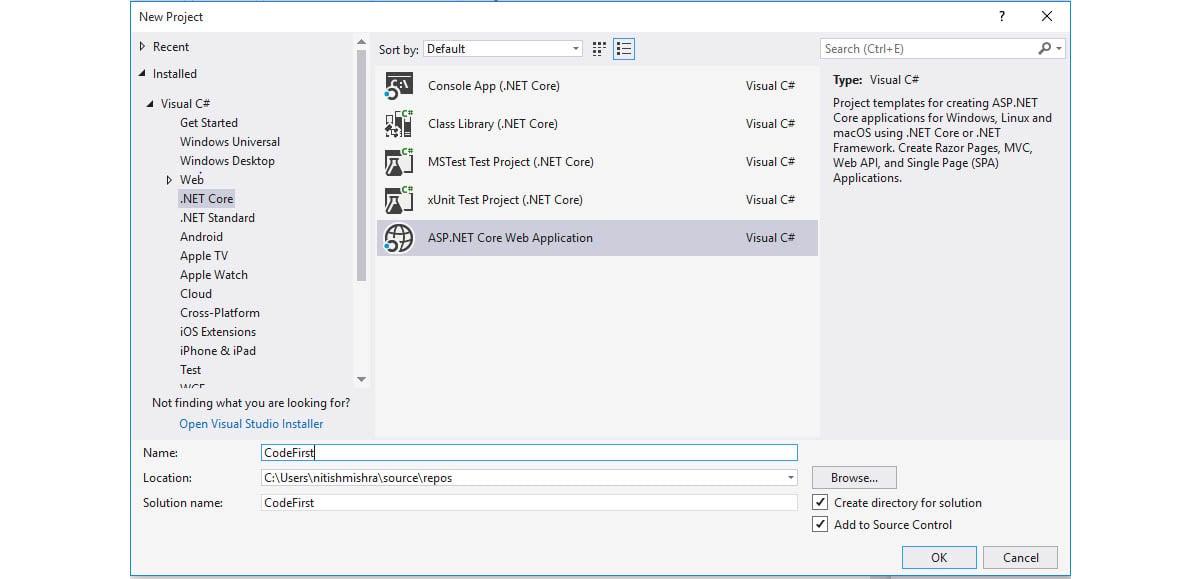
C. New Project windows, from the left board, select Installed > Visual C#>Web.
D. Select the .NET Core Web Application venture format from the center board.
E. Enter ‘CodeFirst’ the name of the project and click OK.
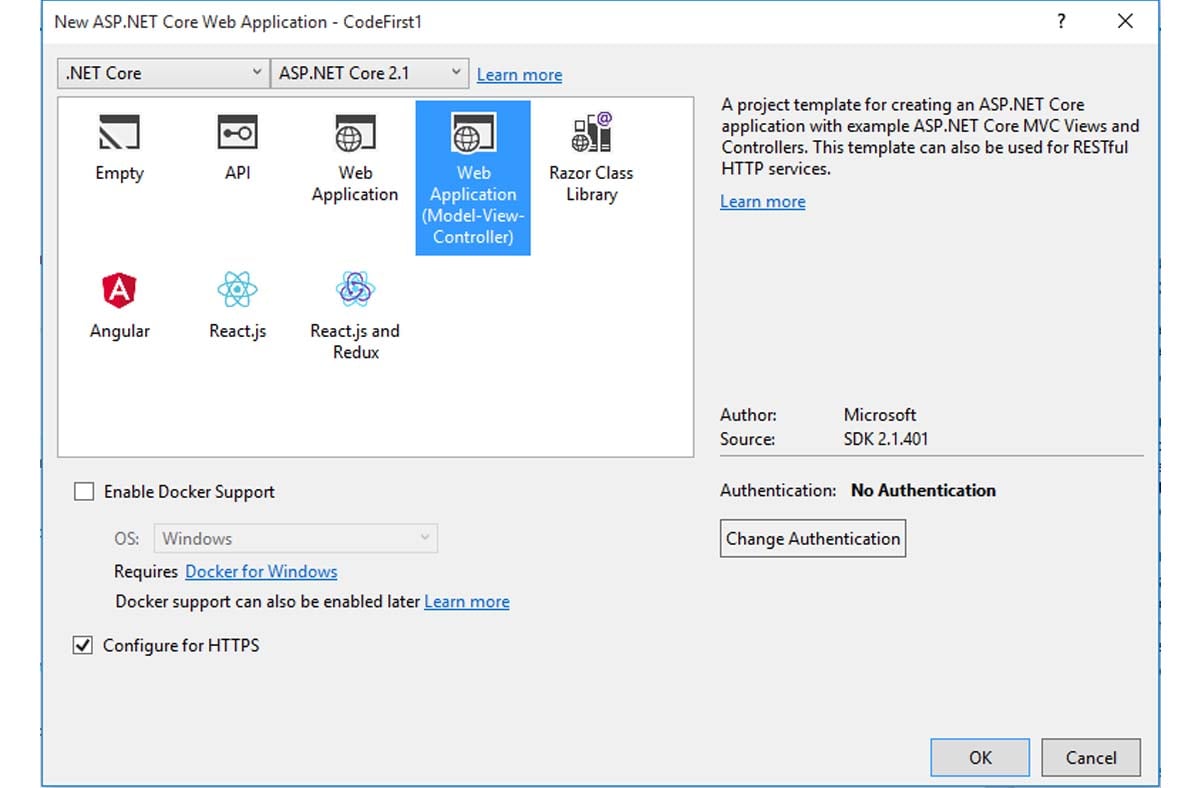
F. A new Dialog will open, Choose the target framework as .NET Core and select the version from the drop-down as NET Core 2.1 as shown in the image below.
G. Web Application (Model-View-Controller) as a layout.
H. Select the Authentication as ‘No Authentication’.
I. Click OK.
2. Install Microsoft.EntityFrameworkCore.SqlServer
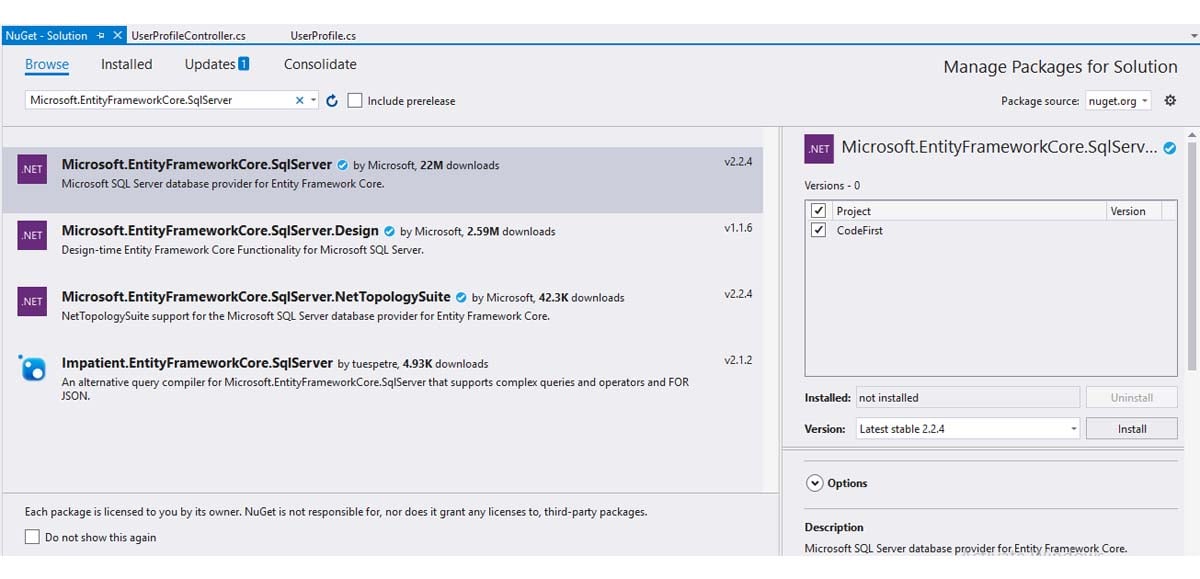
Next Step is to install the package like Microsoft.EntityFrameworkCore.SqlServer which will furnish classes to associate with SQL Server for CRUD operation to Entity Framework Core.
A. Click on Tools and select Nuget Packet Manager>Manage Nuget packet for solutions.
B. Search Microsoft.EntityFrameworkCore.SqlServer and install.
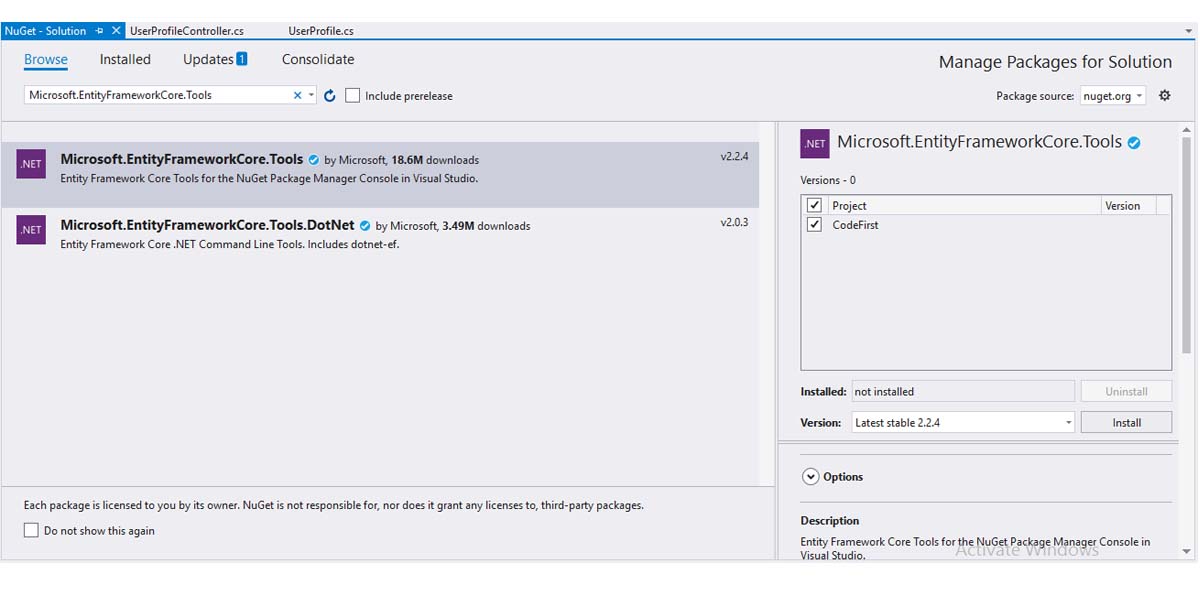
C. In next step install the NuGet package for Microsoft.EntityFrameworkCore.Tools, which will help us to work with database related activity like add migration, script migration, get dbcontext, update the database.
D. Click on Tools and select Nuget Packet Manager>Manage Nuget packet for solutions.
E. Search Microsoft.EntityFrameworkCore.Tools and install.
3. Creating Model, View and Controller
A. Adding a Model
1. Right Click on Models.
2. Select Add From the List, then Select Class.
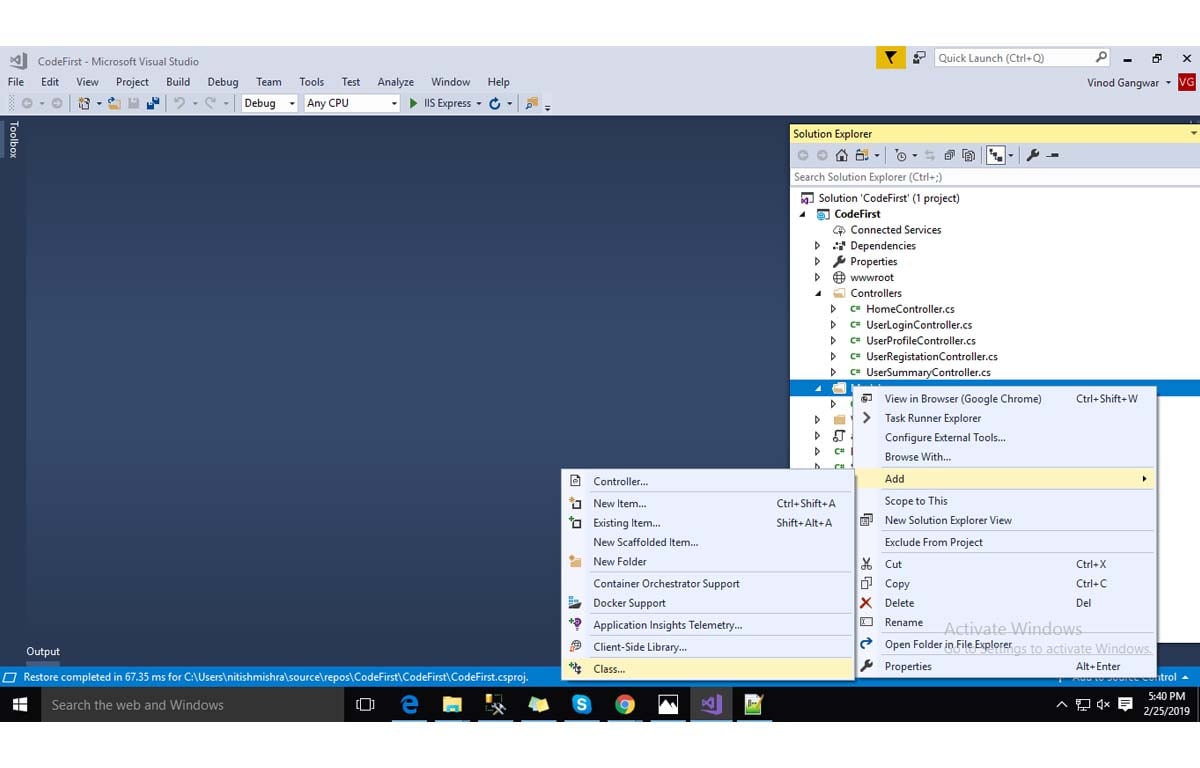
3. Write the name of the Model in Name Field with .cs extension.
4. Click on the Add button.
5. Properties of User Profile Model
public class UserProfile
{
public int Id { get; set; }
public string Name { get; set; }
public string Address { get; set; }
public int Age { get; set; }
public string Dob { get; set; }
public string Phone { get; set; }
}
B. Adding a Controller
1. Right Click on Controller
2. Select Add From the List, Select Controller.
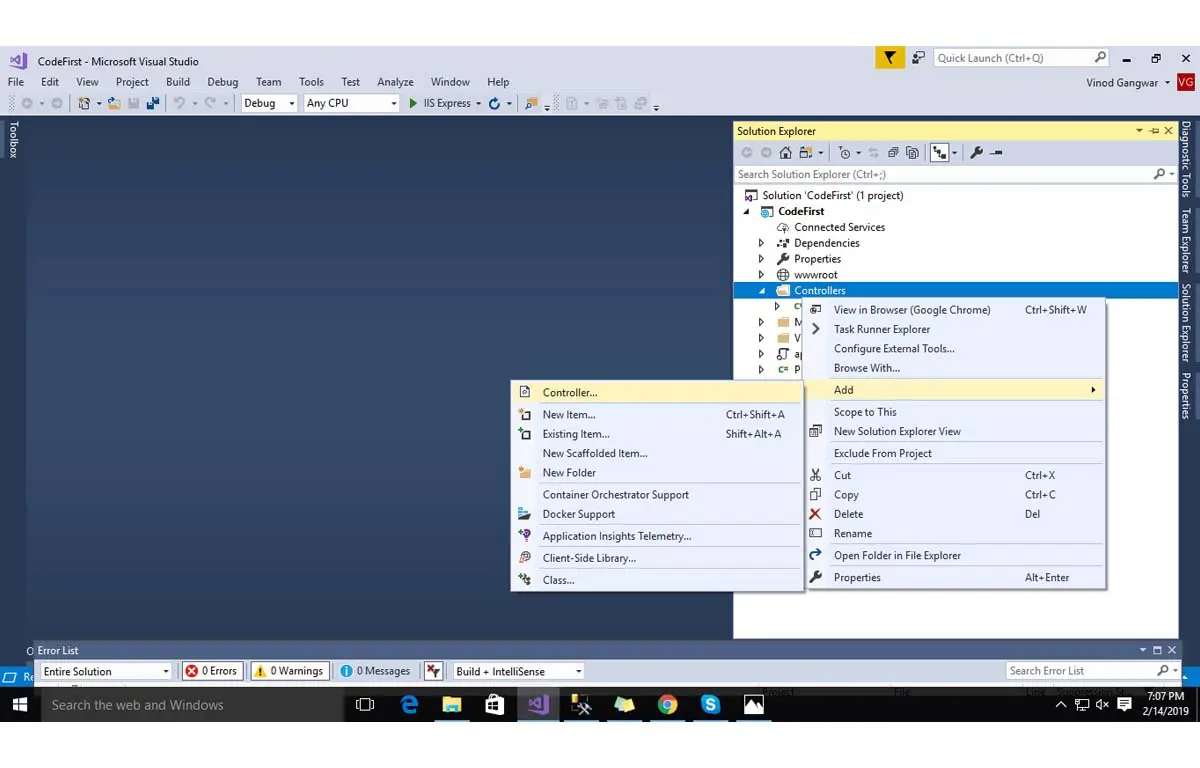
3. Select ‘Mvc Controller-Empty’ from the list.
4. Click on Add.
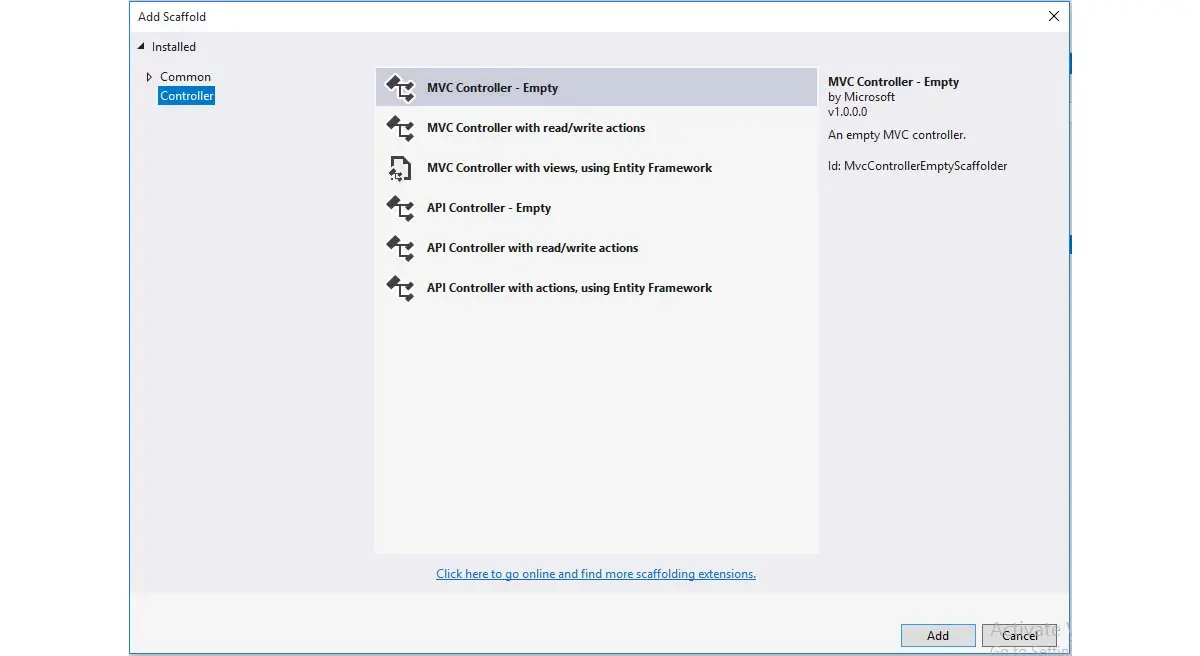
5. Write the name of the controller in ‘ Controller Name’ field.

6.User Profile Controller Code is given below:
namespace CodeFirst.Controllers
{
public class UserProfileController : Controller
{
public readonly UserDbContext _userDbContext;
public UserProfileController(UserDbContext userDbContext)
{
_userDbContext = userDbContext;
}
public IActionResult UserProfile()
{
return View();
}
[HttpPost]
public IActionResult UserProfile(CodeFirst.Models.UserProfile userProfile)
{
if (userProfile != null)
{
_userDbContext.Add(userProfile);
_userDbContext.SaveChanges();
return RedirectToAction(“Index”,”UserSummary”);
}
else
return View();
}
}
}
C. Adding a View
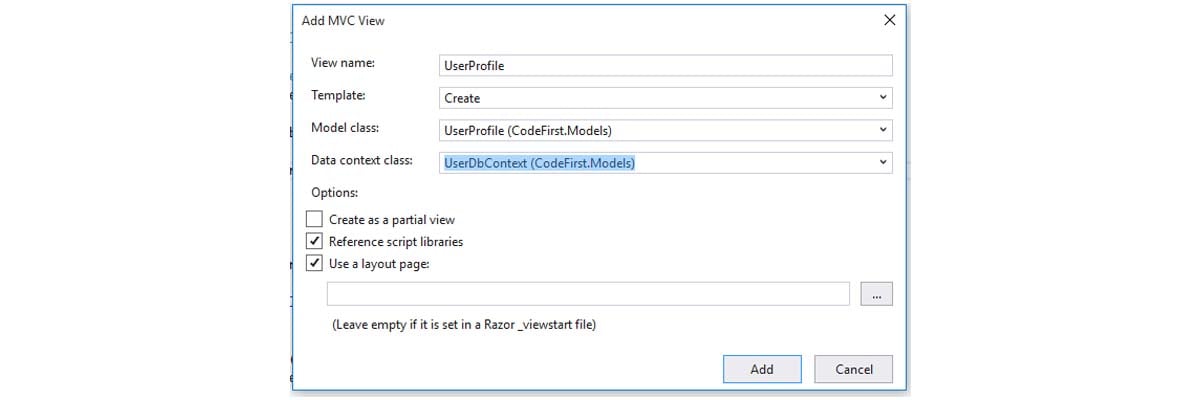
1. Right click on the method of controller
2. Select ‘Add View’ from the list.
3. Write name of View in ‘View Name’ field.
4. Select create in Template field.
5. Select ‘UserProfile’ in Model Class Field.
6. Click on the Add button to create view.
D. User Profile View
1. You can write the specified code in user profile.
2. Repeat Steps 1,2 and 3 for User Login and User Registration Page.
@model CodeFirst.Models.UserProfile
@{
ViewData[“Title”] = “UserProfile”;
}
<h2>UserProfile</h2>
<hr />
<div class=”row”>
<div class=”col-md-4″>
<form asp-action=”UserProfile” asp-controller=”UserProfile”>
<div asp-validation-summary=”ModelOnly” class=”text-danger”></div>
<div class=”form-group hidden”>
<label asp-for=”Id” class=”control-label”></label>
<input asp-for=”Id” class=”form-control” />
<span asp-validation-for=”Id” class=”text-danger”></span>
</div>
<div class=”form-group”>
<label asp-for=”Name” class=”control-label”></label>
<input asp-for=”Name” class=”form-control” />
<span asp-validation-for=”Name” class=”text-danger”></span>
</div>
<div class=”form-group”>
<label asp-for=”Address” class=”control-label”></label>
<input asp-for=”Address” class=”form-control” />
<span asp-validation-for=”Address” class=”text-danger”></span>
</div>
<div class=”form-group”>
<label asp-for=”Age” class=”control-label”></label>
<input asp-for=”Age” class=”form-control” />
<span asp-validation-for=”Age” class=”text-danger”></span>
</div>
<div class=”form-group”>
<label asp-for=”Dob” class=”control-label”></label>
<input asp-for=”Dob” class=”form-control” />
<span asp-validation-for=”Dob” class=”text-danger”></span>
</div>
<div class=”form-group”>
<label asp-for=”Phone” class=”control-label”></label>
<input asp-for=”Phone” class=”form-control” />
<span asp-validation-for=”Phone” class=”text-danger”></span>
</div>
<div class=”form-group”>
<input type=”submit” value=”Create” class=”btn btn-default” />
</div>
</form>
</div>
</div>
<div>
<a asp-action=”Index”>Back to List</a>
</div>
@section Scripts {
@{await Html.RenderPartialAsync(“_ValidationScriptsPartial”);}
}
E. Creating Model, View and Controller For CRUD Operation
1. Right Click on ‘Controllers’ folder
2. Select Add from the list >select ‘New Scaffolded Item’
3. Select ‘Microsoft controller with views, using entity framework’ template from the list.
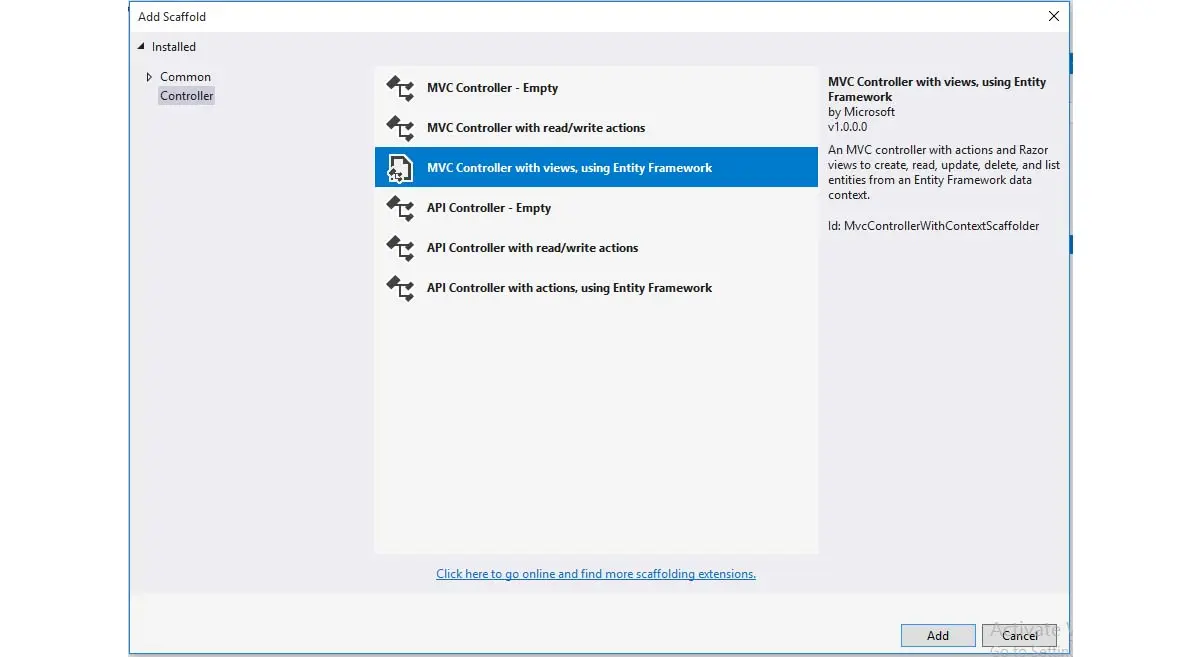
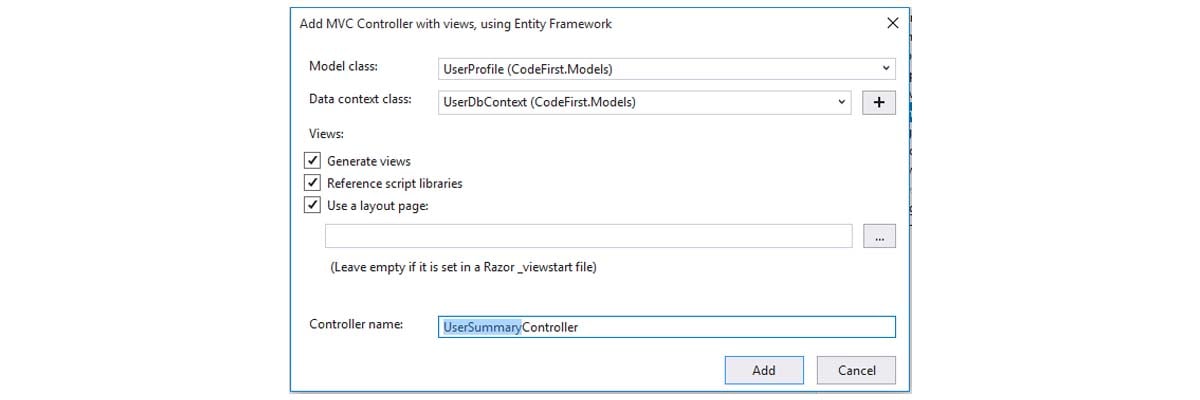
4. Select Model class for which you want to perform CRUD operations.
5. Select DB Context class.
6. Name the Controller.
7. Click on Add.
F. Creating DbContext
1. Right Click on Controllers Folder
2. Select ‘Add’ From the List>New Folder
3. Write Name of the folder ‘DbContext’.
4. Now right click on ‘DbContext’ folder create a ‘UserDbContext.cs’ file.
5. Write the code given below in ‘UserDbContext.cs’.
public class UserDbContext : Microsoft.EntityFrameworkCore.DbContext
{
public UserDbContext(DbContextOptions<UserDbContext> options)
: base(options)
{
}
public DbSet<CodeFirst.Models.UserRegistration> UserRegistration { get; set; }
public DbSet<CodeFirst.Models.UserLogin> UserLogin { get; set; }
public DbSet<CodeFirst.Models.UserProfile> UserProfile { get; set; }
}
G. Establishing Db Connection
1. Open appsettings.Json
2. Write your Sql Server Name in Server.
3. Write your database name in ‘Database’.
4. Write your Sql Server Management Studio Login and Password in UserId and Password.
5.For reference please go through the code which is given below.
{
“Logging”: {
“LogLevel”: {
“Default”: “Warning”
}
},
“ConnectionStrings”: {
“UserDbContext”: “Server=NITESH-PC\\SQLEXPRESS;Database=UserDb;Trusted_Connection=False;MultipleActiveResultSets=true; User Id=sa; Password=root;”
}
}
H. Add Dependency of DbContext to startup.cs
// This method gets called by the runtime. Use this method to add services to the container.
public void ConfigureServices(IServiceCollection services)
{
services.AddMvc();
services.AddDbContext<UserDbContext>(options => options.UseSqlServer(Configuration.GetConnectionString(“UserDbContext”)), ServiceLifetime.Transient);
}
I. Enabling Migration To create table in Database through code
1. Click on the ‘Tools’ in the menu bar of visual studio.
2. Select NuGet Packet Manager>Packet Manager Console.
3. Write ‘add-migration’ and name anything you want to write.
4. Then write ‘Update-database’ it will create a ‘Migration’ folder which contains Migration.cs file
5. You will see in SQL server management studio database automatically Database Name ‘UserDb’ and Three tables Login, Registration and Profile is created.
6. For reference please go through the code which is given below.
PM> add-migration
cmdlet Add-Migration at command pipeline position 1
Supply values for the following parameters:
Name: Test
The EF Core tools version ‘2.1.1-rtm-30846’ is older than that of the runtime ‘2.1.2-rtm-30932’. Update the tools for the latest features and bug fixes.
Microsoft.EntityFrameworkCore.Infrastructure[10403]
Entity Framework Core 2.1.2-rtm-30932 initialized ‘UserDbContext’ using provider ‘Microsoft.EntityFrameworkCore.SqlServer’ with options: None
To undo this action, use Remove-Migration.
PM> update-database
The EF Core tools version ‘2.1.1-rtm-30846’ is older than that of the runtime ‘2.1.2-rtm-30932’. Update the tools for the latest features and bug fixes.
Microsoft.EntityFrameworkCore.Infrastructure[10403]
Entity Framework Core 2.1.2-rtm-30932 initialized ‘UserDbContext’ using provider ‘Microsoft.EntityFrameworkCore.SqlServer’ with options: None
Microsoft.EntityFrameworkCore.Database.Command[20101]
Executed DbCommand (20ms) [Parameters=[], CommandType=’Text’, CommandTimeout=’30’]
SELECT OBJECT_ID(N'[__EFMigrationsHistory]’);
Microsoft.EntityFrameworkCore.Database.Command[20101]
Executed DbCommand (1ms) [Parameters=[], CommandType=’Text’, CommandTimeout=’30’]
SELECT OBJECT_ID(N'[__EFMigrationsHistory]’);
Microsoft.EntityFrameworkCore.Database.Command[20101]
Executed DbCommand (1ms) [Parameters=[], CommandType=’Text’, CommandTimeout=’30’]
SELECT [MigrationId], [ProductVersion]
FROM [__EFMigrationsHistory]
ORDER BY [MigrationId];
Applying migration ‘20190423093143_Test’.
Microsoft.EntityFrameworkCore.Migrations[20402]
Applying migration ‘20190423093143_Test’.
Microsoft.EntityFrameworkCore.Database.Command[20101]
Executed DbCommand (6ms) [Parameters=[], CommandType=’Text’, CommandTimeout=’30’]
INSERT INTO [__EFMigrationsHistory] ([MigrationId], [ProductVersion])
VALUES (N’20190423093143_Test’, N’2.1.2-rtm-30932′);
Done.
4. Finally, you can run the application and execute the following operations.
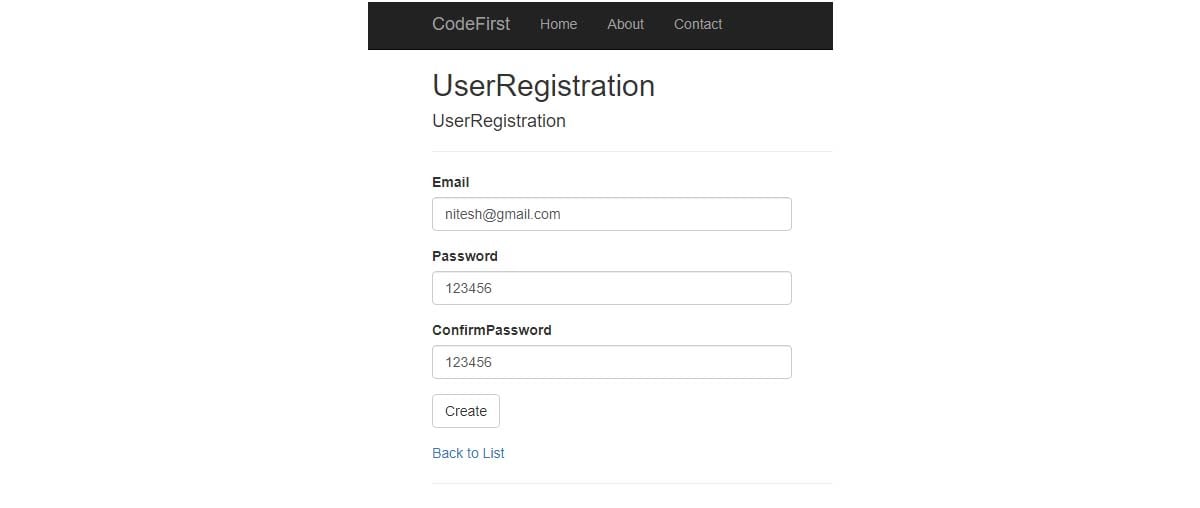
A. User Registration
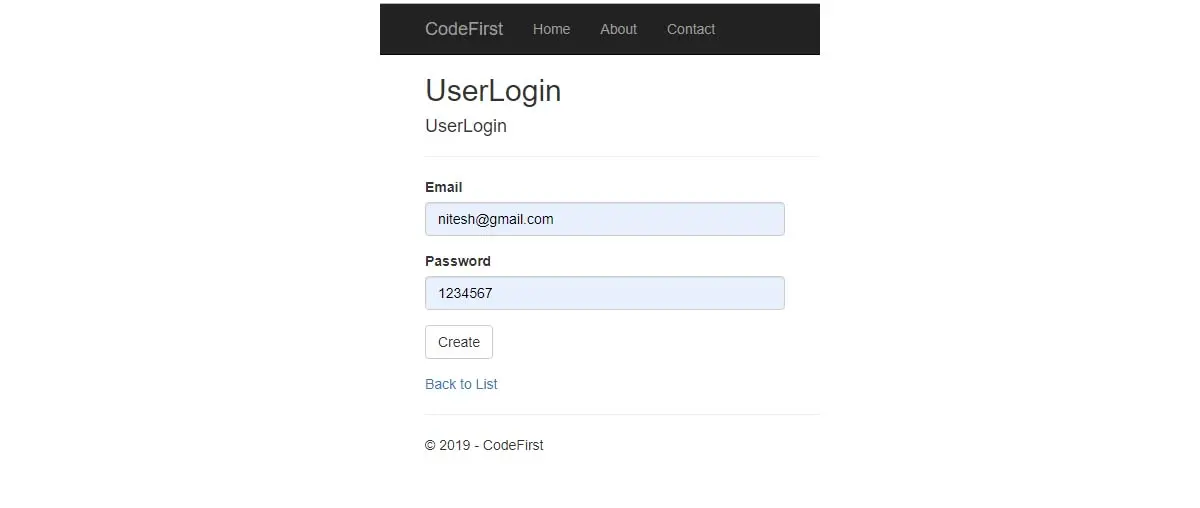
B. User Login
1. In this step, you have to write the same UserId and Password through which you have registered.
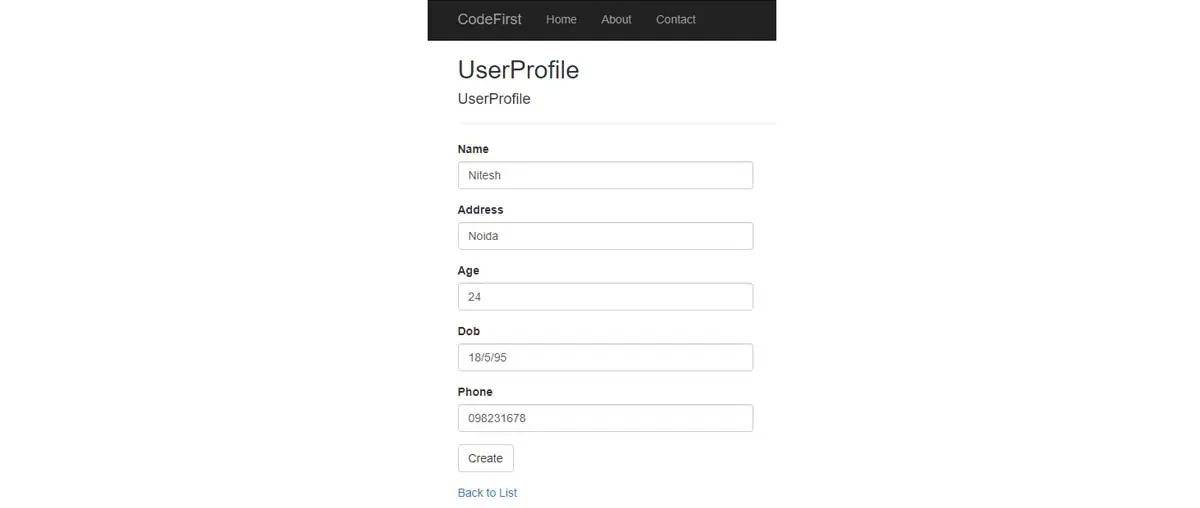
C. User Profile
1. In this step you have to fill the profile of the user.
D. CRUD Operation (Edit)
1. Summary Page Before CRUD Operation

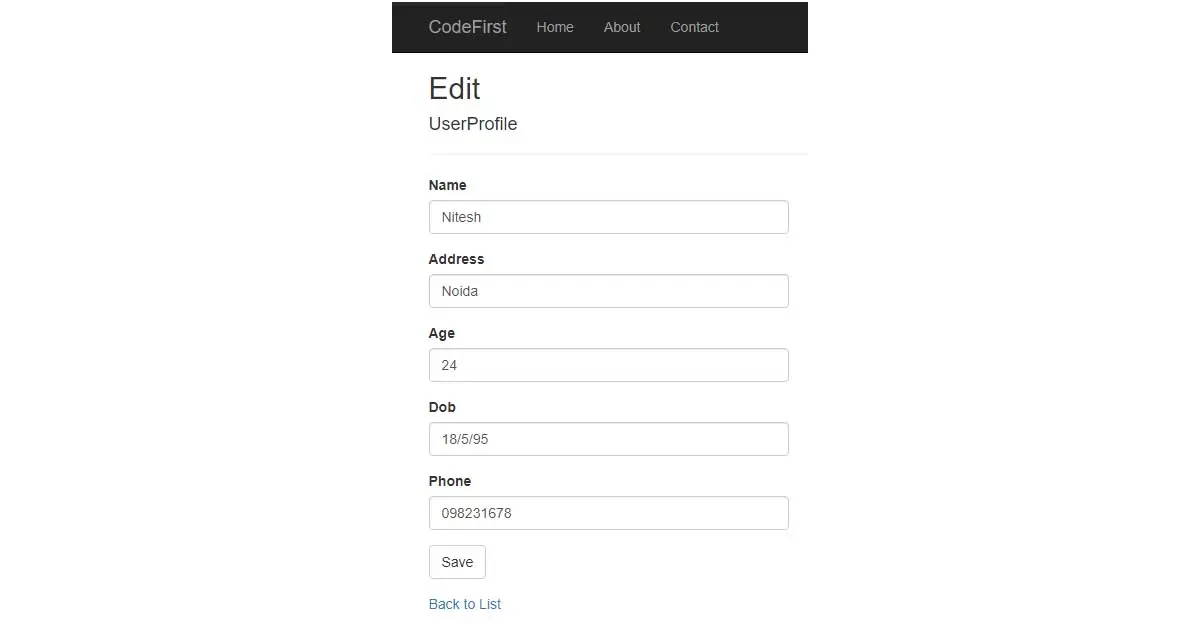
2. For Performing ‘Edit’ operation Click On the Edit button of Summary Page
3. Edit Name to ‘Nitesh Kumar Mishra’ Age ‘25’.
4. Click on Save.
5. You can see changes in Summary Page after the edit operation is done for ‘Nitesh’ Profile Detail.

E. CRUD Operation (Create)
1. For Performing ‘Create’ operation Click On ‘Create New’ button of Summary Page
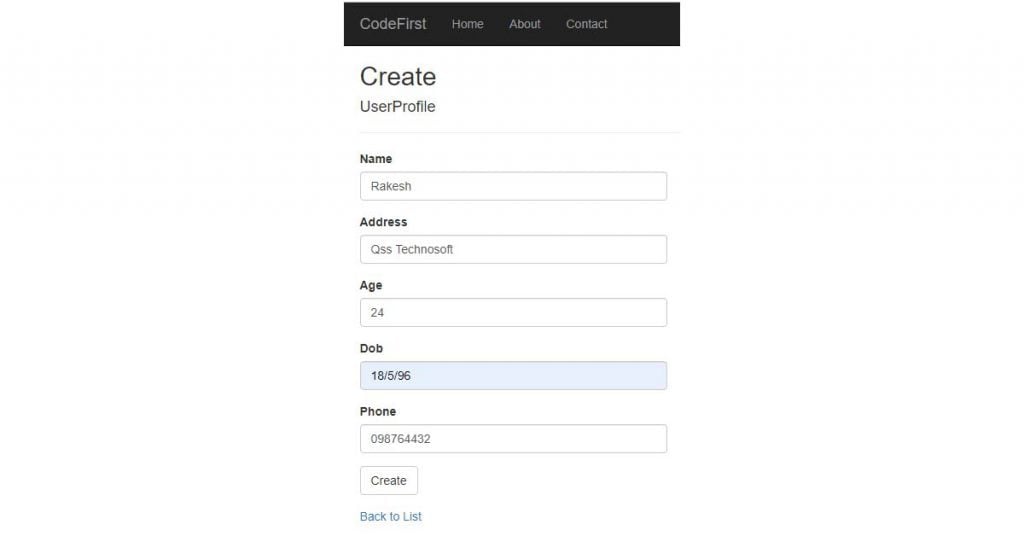
2. Fill all the details and click on the save button.
3. As you can see I have created a new profile for ‘Rakesh’. Now you can see in Summary Page.

F. CRUD Operation (Details)
1. For Performing ‘Create’ operation Click On ‘Details’ button of Summary Page.

G. CRUD Operation (Delete)
1. For Performing ‘Create’ operation Click On ‘Create New’ button of Summary Page
2. Then New View Page of Delete is opened click on the ‘Delete’ button
3. Then record of ‘Rakesh’ will get deleted.
You can see that the record of ‘Rakesh’ is deleted from the ‘Summary Page’.

The code for this project is available on GitHub at: https://github.com/drNitesh/CRUD-Code-First-/tree/master/
About Author:
Nitesh Kumar Mishra is working in QSS Technosoft as a Software Engineer. He is an enthusiastic developer eager to learn new things.
About QSS Technosoft:
QSS Technosoft has a proven track executing .Net applications for its esteemed customers. The company has a core competency in developing and delivering enterprise level .Net applications. The .Net competency has experienced and dedicated team of .Net developers.


How to Perform CRUD Operations Using Code First Approach in Asp.Net Core?