Abstract
This article targets folks/teams who deploy their applications with Vagrant (VMs) or without any kind of container or images or virtualization but would like to switch to Docker. This is not just an introduction to Docker. Hence, I assume, you might have at least basic knowledge of Docker and Nodejs.
Introduction
Gone are the times when we needed an in-house Hardware, Server and Storage setup to Deploy our Applications. With the availability of Clouds like AWS, Google Cloud, Azure etc and VPS, the effective cost to deploy, maintain and manage applications along with deployment metrics has been reduced drastically.
But to target every device/platform out there in every stage including development, every environment still needs to be the same.
Introduction of the Containers and VMs resolved the issue of “It works on my machine”. The Containers have been out there for a while now. IT Giants like Google and Microsoft have been using Containers even before the idea of Docker caught the pace.
Containers vs Hypervisors
If you ever heard of or used Virtual Machines extensively, you know how useful it can be especially when deploying application to production or in the cloud. VM runs on the top of Hypervisor, which in turn, runs on the top of Supervisor.
What are Hypervisors? I’m glad you asked that. Hypervisors, themselves, run on physical machines, called “host machines”. Host machines allocates, if required, resources including RAM and CPU, so that CPU intensive operations can performed. Hypervisors (also called as Guest Machine) can be either hosted or Bare-Metal(native).
Bare-Metal Hypervisors runs directly on the host machines consuming resources and managing guest operating systems. The perfect examples of Bare-metal Hypervisors are Oracle VM Server and X-box One system software. Whereas, Hosted Hypervisors, have a layer of host OS squeezed between hosted hypervisors and host machine resources. The perfect examples for hosted hypervisors are Parallel Desktops for Mac and VirtualBox.

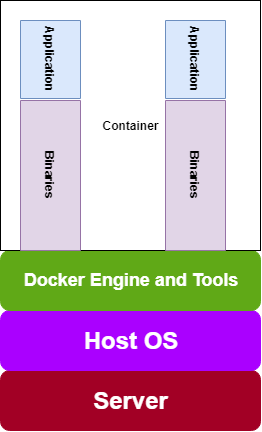
VMs, in simple, are virtualizations on Hardware level. But unlike VMs, Containers provides us virtualization on Operating System level by abstracting “user space”. Containers have their own private space processing (processors), they can execute commands as root user, have network interfaces and IP address, custom routes, file systems etc. Also, host system’s kernel is shared with every container running on the same host machine.

That’s where Docker comes in!
Docker is an open source projects based on Linux containers by default. Docker is based on “build once, run anywhere” mantra. They are easy to use for Developers, architects, system admins, DevOps and others. Containers are portable, lightweight and faster than Hypervisors. They are basically sandboxed environments running on kernels.
Docker Build Container Patterns
Traditionally, One Dockerfile results in One Docker Image. But to ship the application to production, one might need to pack all the
Dependencies and Tooling (compilers, linters and testing tools) in the same container with separate Dockerfiles. Later, all the Dockerfiles would result in lean, secure and production ready Images.


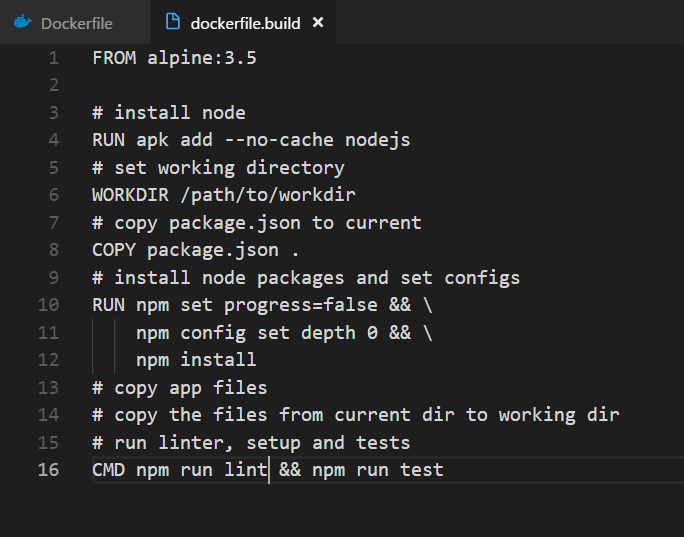
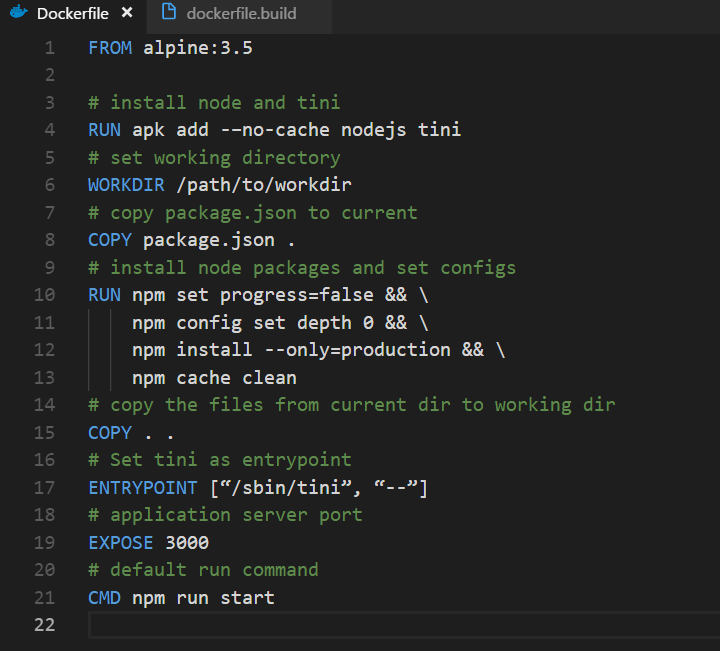
The above codebase is the perfect example for typical Build Pattern for Node Docker Images. ( Note: A library called “Tini” has been used. Tini, in simple words, spawns a new child process, which runs in a container, performs the execution and wait for it to finish)
In Dockerbuild.build file,
- Alpine-Linux versioned 3.5 gets installed.
- Package Manager apkadds node the image
- Working Directory has been set as the base
- Package.json file is added to the current workspace inside the container
- All the dependencies get installed without recursions and for the production stage only
- Lastly, Linters and Testing suites (if set in package.json) gets a run
In the next Dockerfile, similarly
- Alpine-Linux gets installed
- Package Manager apkadds node and tini to the container
- Working Directory has been set as the base
- Package.json file is added to the current workspace inside the container
- All the dependencies get installed without recursions and for the production stage only
- The current directory gets copied to the base directory inside the container
- Entry point has been set with Tini to spawn a child process Terminal inside the container
- Application Port 3000 has been exposed from the container
- Finally, application is ready to run
What is Multi-Stage Docker build?
Prior to Docker 17.05, to get the application ready for any stage including QA Testing, multiple Dockerfiles was required, which was repetitive, and it takes twice or even thrice the times the resources, caused slower Docker builds, Huge Docker builds and slower Deployment and lots of CVE violations.
Multi-Stage Docker come to the rescue! With Multi-Stage Build Patterns not only Dockerfile gets slimmed, the final production ready Container will have what’s essential to run the Application in the Container, which results in faster Deployment Time and smaller Builds, hence providing more efficiency.
With multi-stage builds, we use multiple FROM statements in our Dockerfile. Each FROM instruction can use a different base, and each of them begins a new stage of the build. We can selectively copy artifacts from one stage to another, leaving behind everything you don’t want in the final image.

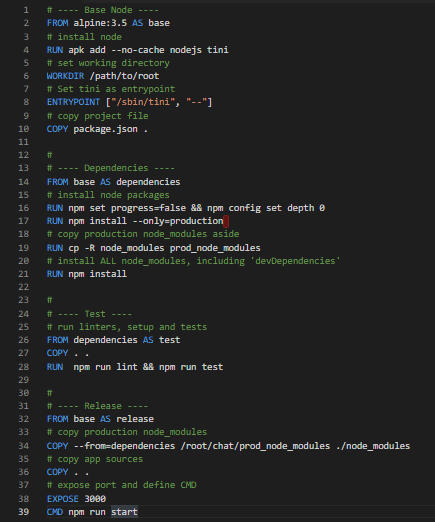
Let’s adapt to the example used in the previous section. In the above Dockerfile, every stage has been condensed to the single file.
- First image FROM alpine:3.5 AS base – is a base Node image with: node, npm, tini and package.json.
- Second image FROM base AS dependencies – contains all node modules from dependencies and devDependencies with additional copy of dependencies required for final image only
- Third image FROM dependencies AS test – runs linters and tests if this run command fail not final image is produced
- The final image FROM base AS release – is a base Node image with application code and all node modules from dependencies
Conclusion
With Docker 17.05 version, it is possible to implement a single slimmed out Dockerfiles for the production-ready Image for our Docker Registry deployment.
There is more to Multi-Stage builds than We’ve learned today. We can even Stop the Docker Build at specific stage, which gives us a powerful functionality to debug a specific stage.

About Author:
Mohit Sharma is a Full Stack Developer working with QSS Technosoft specializing in Ruby-on-Rails, Python, React, Dart, Angular and Nodejs. He has completed his bachelor’s degree in Electrical and Power Eng. But always had the passion and heart towards the Computer Science. He has certifications in Machine Learning and Docker.
About QSS:
QSS has a proven track executing web and mobile applications for its esteemed customers. The company has a core competency in developing and delivering Enterprise level using node.js. The node.js competency has experienced and dedicated team of node.js developers. To Know More..

Multi-Stage Nodejs Build with Docker in Production