Abstract
This article is about RabbitMQ and targeted users who wish to take advantage of RabbitMQ.
In this article we are going to learn…
What is RabbitMq
How to install
Need of rabbit mq in web development
The article has some codesnippets as examples, which will explain how to publish and consume data using rabbit mq.You will also learn how to create exchanges and queue.How to bind these queues, how to use prefetch() function and how to send acknowledgement of a message to the rabbit mq.In this article, I will code in javascript, however, RabbitMq support various popular programming languages
Introduction
RabbitMq is an open source message broker software that originally implemented the AMQP and has since been extended with a plug-in architecture to support and enhance its features. RabbitMq was written in Erlang, this must be installed in your machine to run Rabbitmq server.
RabbitMq provides library support for numbers of programming languages like java, javascript, C# etc.
What is message broker software?
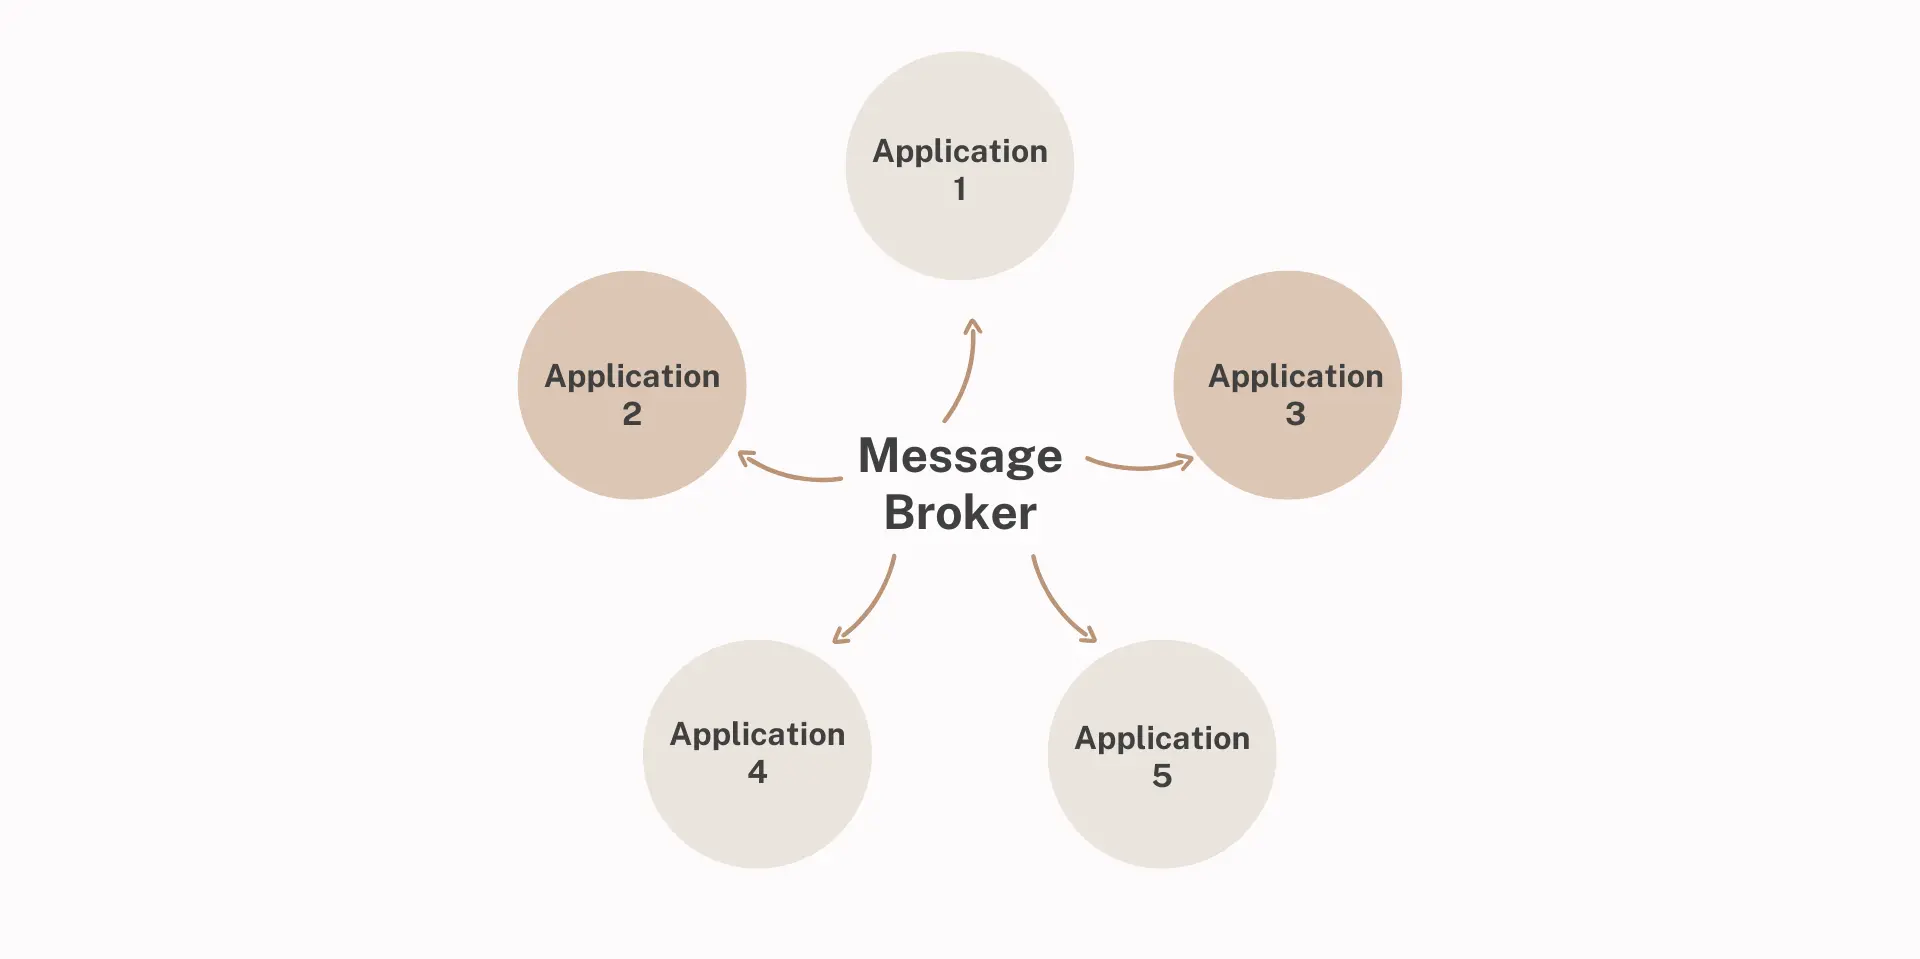
The message broker is an intermediary program module which lies between two software application. One software application is known as the publisher and another one is called the subscriber. So message broker decouples communication between them. It means publisher does not need to know anything about subscriber application, it only needs to send data to the message broker and subscriber will consume data from the message broker.

So the RabbitMQ is a message broker.
What is AMQP?
The Advanced Message Queuing Protocol (AMQP) is a messaging protocol that enables confirming client applications to communicate with conforming messaging middleware brokers. And RabbitMq has implemented this protocol in its architecture. This model consists of the following parts:
- Exchanges
Exchanges in RabbitMq can think of a post office or a mailbox which distribute message copies to the queue using exchange queue binding. - Queues
Queues are simple data structure implemented by RabbitMq to store message published by the publisher.
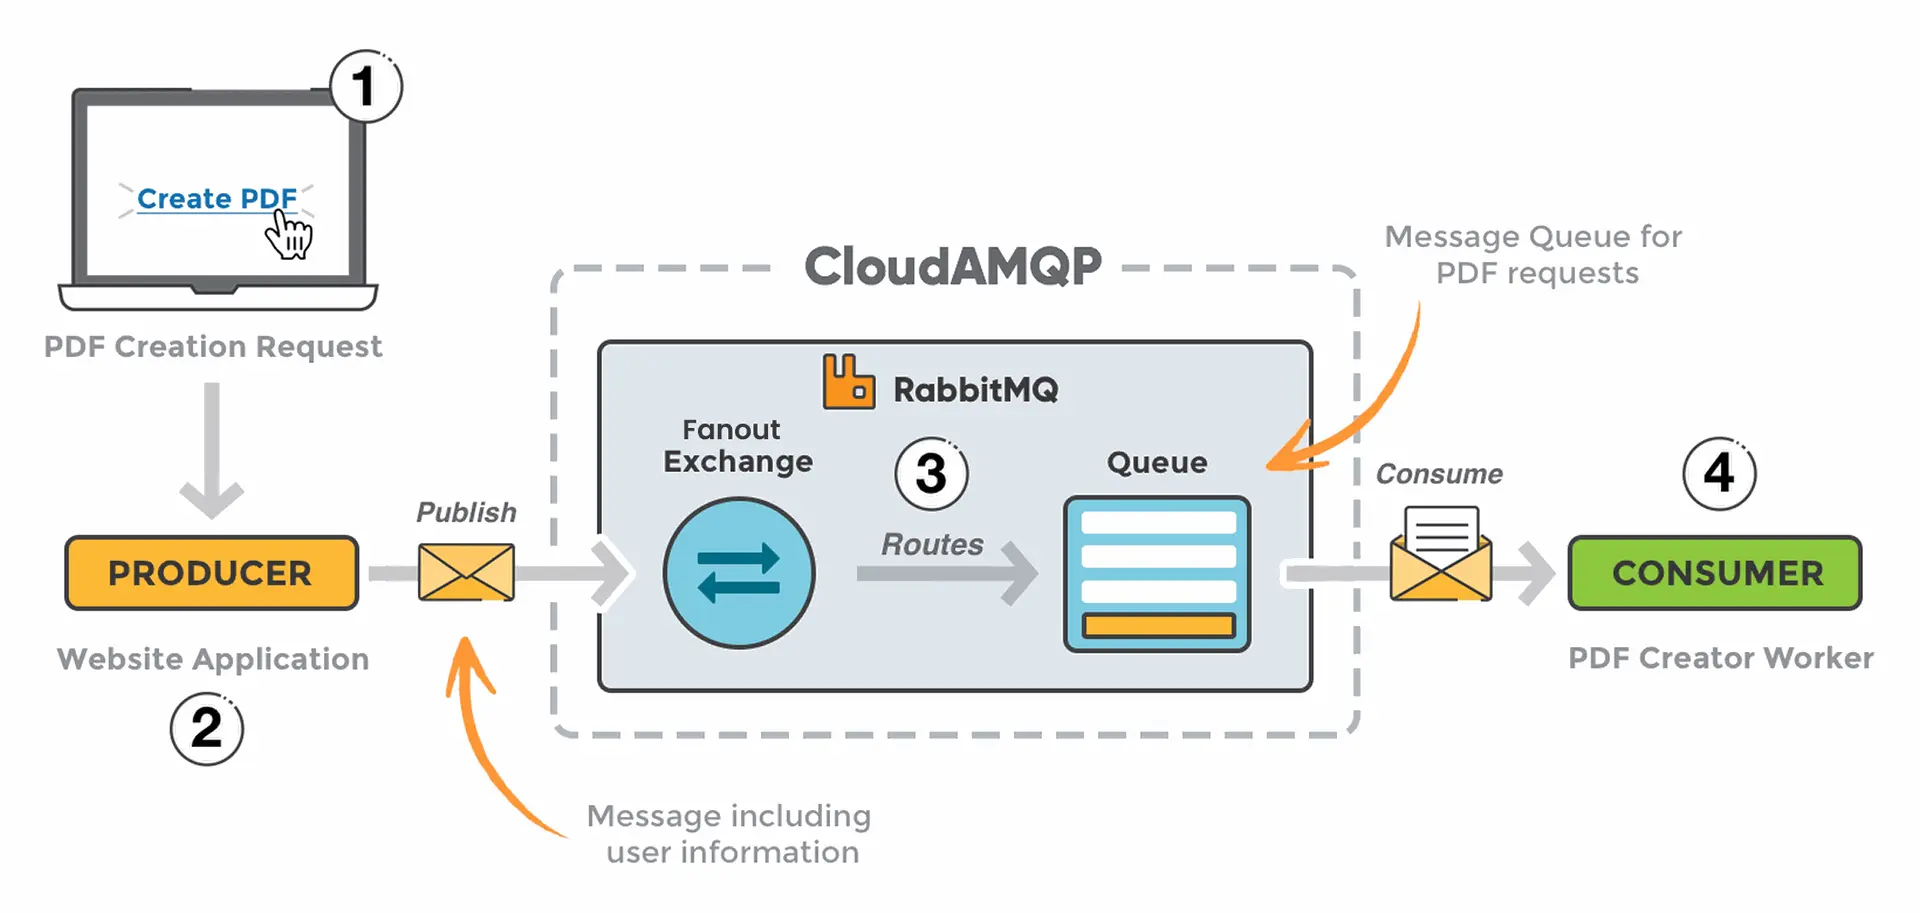
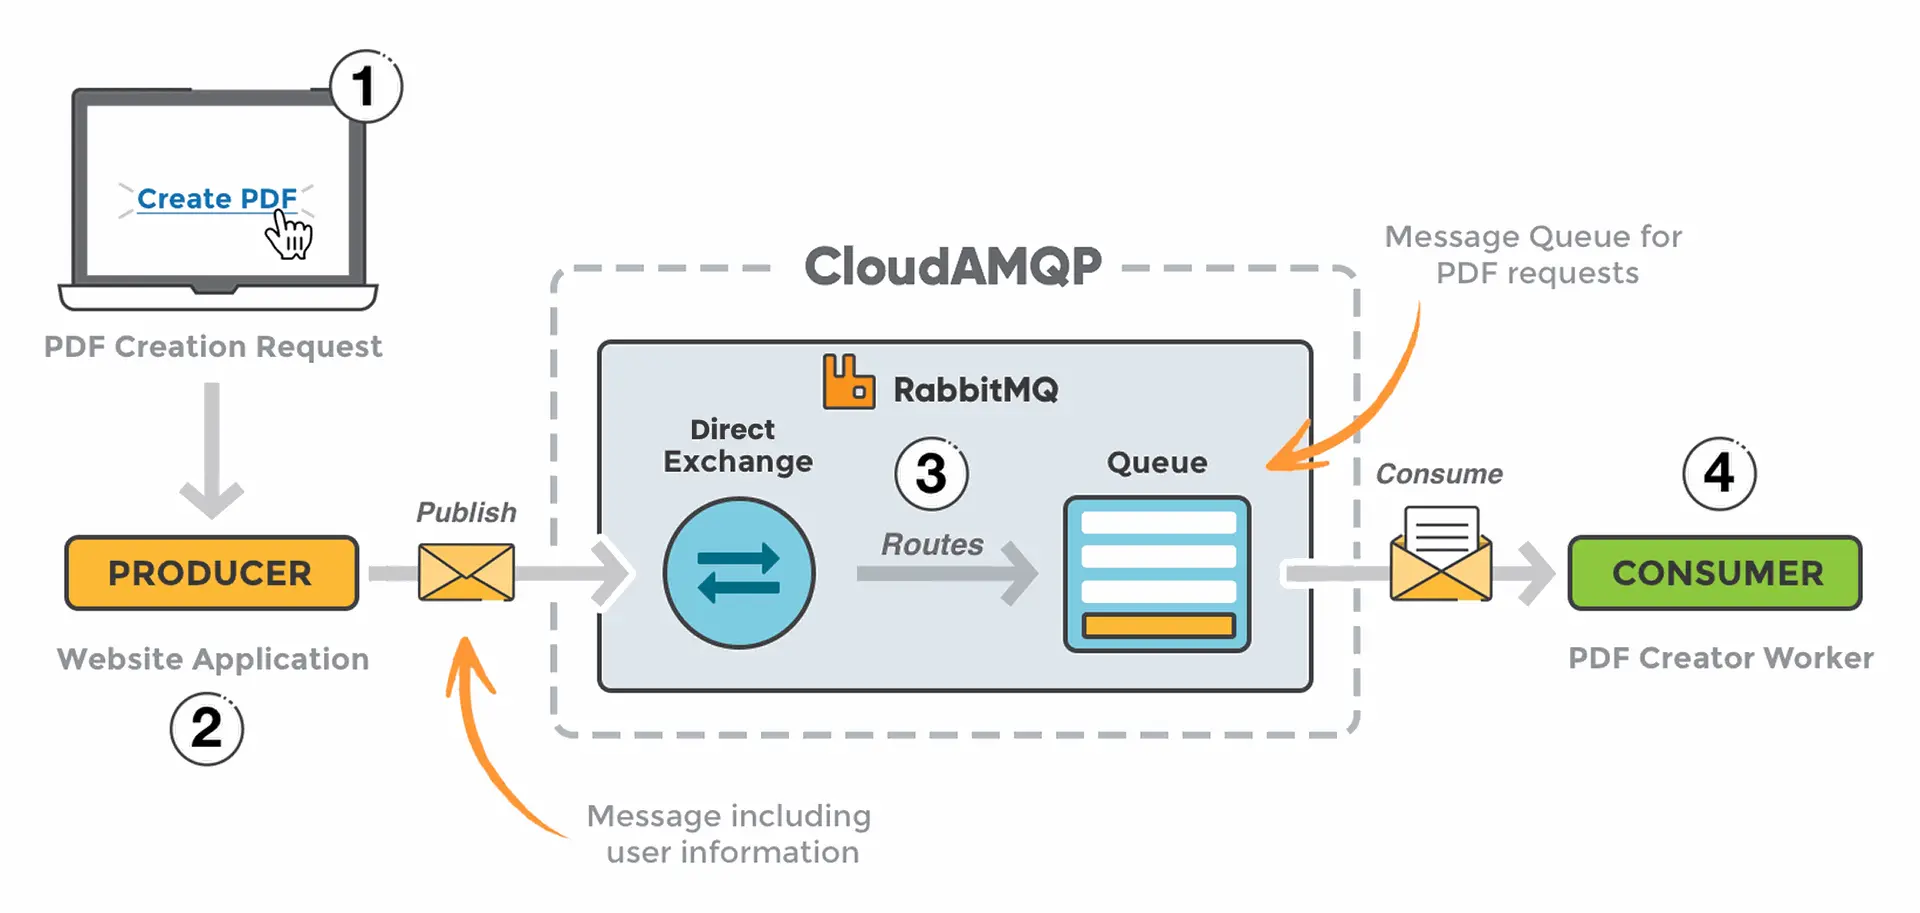
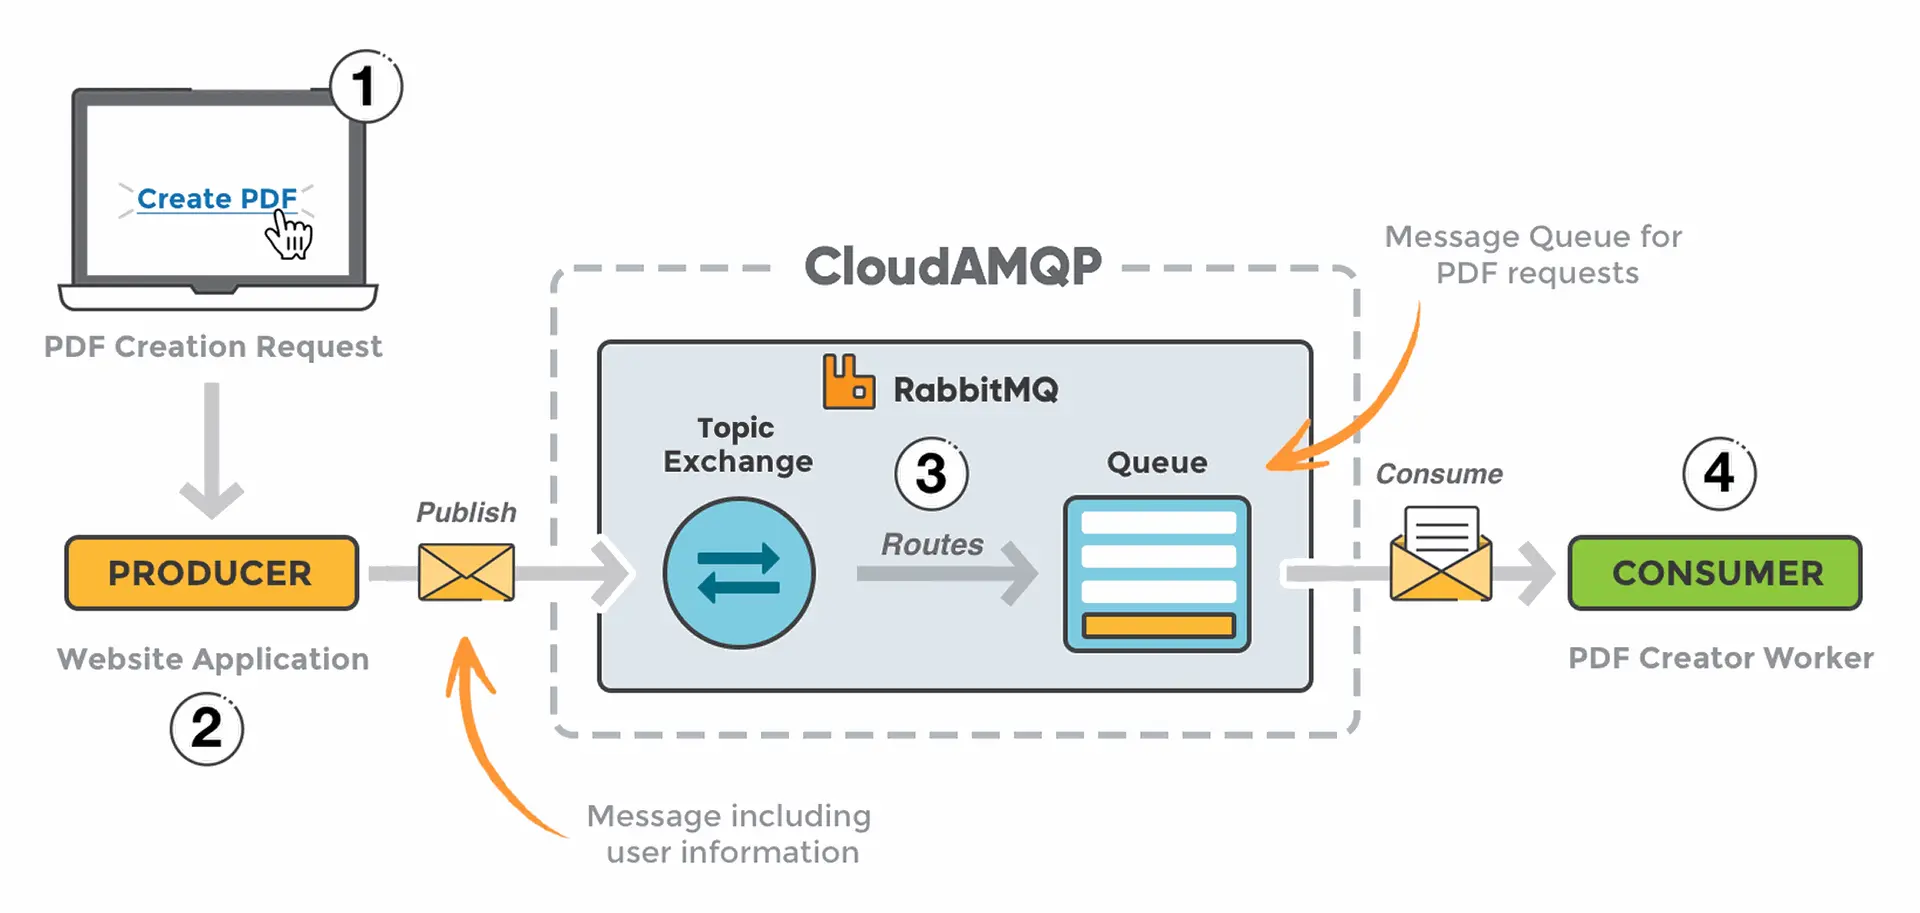
In RabbitMq architecture, a publisher sends a message to the exchange making a connection to the RabbitMq. Now it is the Exchanges responsibility to routes these messages to specified queues, where in, publisher doesn’t need to care about the routing of messages to the queue. Exchange finds specific queue and route that message to it. After sending data to the queue, the consumer application can fetch these messages from the queues and consumed message will be deleted from the queue only when the acknowledgment of the consumed message arrived at the message broker.
Types of Exchanges
- Fanout
This is a broadcast exchange, which transmits the message to all available queues.
- Direct
This exchange type transmits the message to those queues which consist of an exchange queue binding key.
- Topic
This exchange follows a specified pattern during message transmission. During exchange queue binding some patterns are defined, and those queues which follow these patterns get data from the exchange.
We can make these exchanges durable to survive server restart.
DOWNLOAD AND INSTALLATION
The link below consists all the information you need to download and install RabbitMq on your machine. http://www.rabbitmq.com/download.html
NEED OF RABBIT MQ IN WEB DEVELOPMENT
As we are aware users on the web are growing exponentially, every second thousand or sometimes millions of users interact with the web server or database server. Due to the large amount request coming to the server in a single instance it may get crash and stop responding to the users.
To overcome these kinds of situation rabbit MQ can be used.
As we know user request processing is a time-consuming task. Instead of direct interaction to the application server, we push the entire request to the queue.At the consumer end of that queue, we consume one or more than one request(depends on our application how many requests we want to process during a single consume operation) and process those number of requests at a single time, resulting less burden on application server.
IMPLEMENTATION OF RABBIT MQ USING NODEJS
First, you need to create a node.js application in any specified folder. Install amqplib in your node_modules using the command:-
npm install --save amqplib
This library consists all the files required to make the connection to RabbitMq server.
Note:
RabbitMq server and Erlang must installed to your machine and properly configured as shown on rabbitmq official websites. Otherwise, connection won’t establish between your application and rabbitmq server.
Now create a file name RabbitMq.js and define the following function in it:
- Comments are provided to make code understanding more clear.
- “getConnection” function will create a connection object to rabbitmqand returns a connection and error
object.constgetConnection = function(){ returnnewPromise(function(resolve, reject){ amqp.connect('amqp://localhost', function(err,conn){ if(err) reject(err); console.log('connection established to rappitmq') resolve(conn); }) }) } - “getPublisher” function return publishData and closeConnection function to publish data to rabbit mq
and to close the connection to it, respectively taking exchange name as a parameter.// this function return publish data function taking exchange name as a parameter constgetPublisher = function(exchangeName){ returnnewPromise(function(resolve, reject){ getConnection().then(con=>{ con.createChannel(function(err, ch){ if(err) reject(err); // queue Name is your given exchange name as parameter following 'myQueue' varq = `${exchangeName}_myQueue` // this create exhange and queue and does binding of queue to the exchange rabbitService.createExchangeAndBindQueue(exchangeName, q, ch); // this function will be returned to publish data to rabbit mq varpublishData = function(msg){ ch.publish(exchangeName, q, newBuffer(JSON.stringify(msg))); } // this function will also be returned to close the connection to the rabbit mq after publishing data varcloseConnection =function(){ con.close(); console.log('connection closed!') } // return both the function as a promise object resolve({publishData:publishData,closeConnection}); }) }) }) } - “getConsumer” function will return a channel object, which will be used by user to consume
data/message from rabbitmq. This function takes exchange name as an argument.//this function will return the channel object to consume data constgetConsumer = function(exchangeName){ returnnewPromise((resolve, reject) => { getConnection().then(con=> { con.createChannel((err, ch) => { if(err) reject(err); //this is name of queue varq = exchangeName + "_myQueue"; // this create exhange and queue and does binding of queue to the exchange rabbitService.createExchangeAndBindQueue(exchangeName, q, ch); // returning channel object resolve(ch); }) }) }) } - “createExchangeAndBindQueue” function will create the exchange and queue.
- This function binds exchange and queue by making exchange type “direct” and making “durable = true”
so that they can survive the server failure.functioncreateExchangeAndBindQueue(exchangeName, q, ch){ // creating exchange with given name // setting exchange type direct // making it durable so that it can survive the server failure ch.assertExchange(exchangeName, 'direct', {durable:true}); // creating queue and making it durable ch.assertQueue(q, {durable:true}); // binding the queue with the exchange // first parameter is queue name // second one is exchange name // third parameter is binding key, which is require in direct exchange to route the message specific queue. ch.bindQueue(q, exchangeName, "myKey"); } - Export getPublisher and getConsumer function, so that we can import them in publisher.js.
module.exports = { getPublisher, getConsumer1 } - Now create a file publisher.js and write down the following code init:
constrabbitMq = require('./rabbitMq'); rabbitMq.getPublisher("myExchange").then(mq=> { mq.publishData("hello, world"); setTimeout(() => { mq.closeConnection() }, 500); }); - in this file, we called the getPublisher function which makes the connection to the rabbit mq and
provides two functions: “publishData” and “closeConnection”. - By using the publishData function we are publishing data to the rabbit mq.
- After 500ms of publishing data, we are closing the connection to the rabbit mq.
Now open your terminal and write command:
nodepublisher.js
Congratulations! “Hello, world” successfully published to rabbit mq.
Now it is time to consume this message.
- Create another file consumer.js and write down following code in this.
          constrabbitMq = require('./rabbitMq');
          rabbitMq.getConsumer("myExchange").then(ch=>{
          // prefetch(1) only one message will be allowed to coming out from the queue.
          // after getting the acknowledgement of previous message next message will be enqueued
          // unless previous will remain in queue and will be deleted only when the acknowledgement sent by
          //consumer
          ch.prefech(1);
         // consume function will consume the message one by one.
         ch.consume("myExchange_myQueue", function(msg){
         // msg object contain publisher msg and metadata
         // we are parsing msg to get, message sent by publisher
         message = JSON.parse(msg.content.toString());
         console.log('received message from rabbit mq is:', message);
        // sendingacknowledgement to the rabbit mq or message broker
        ch.ack(msg);
     },
     {
       // if it is set to true, in that case no need to send acknowledgement to the message broker
       noAck:false
     })
  });
Now type the following command to start our receiver
nodeconsumer.js
you will receive “hello, world” on your terminal.
About Author:
Rakesh Sharma is a JavaScript developer currently working with QSS Technosoft. He is a technology writer in, JavaScript libraries and frameworks like Reactjs, node.js, rabbitMq, and graphql. He has completed his bachelor’s degree in Information Technology from GGSIPU.
About QSS:
QSS has a proven track executing Java script based applications for its esteemed customers. The company has a core competency in developing and delivering Enterprise level React JS, Angular JS and node.js applications. The java script competency has experienced and dedicated team of full stack developers developers. To Know More...

What is RabbitMQ